


基础教程:
Debian 10.9.x安装配置图解教程
https://www.osyunwei.com/archives/11103.html
准备篇:
一、配置防火墙,开启80端口、3306端口
Debian默认没有安装任何防火墙的,我们这里推荐使用iptables防火墙。
1.1安装iptables防火墙
whereis iptables #查看系统是否安装防火墙
apt-get install iptables #运行此命令安装防火墙
mkdir /etc/sysconfig #创建防火墙配置文件存放目录
touch /etc/sysconfig/iptables #创建防火墙配置文件
nano /etc/sysconfig/iptables #编辑添加防火墙规则
# sample configuration for iptables service
# you can edit this manually or use system-config-firewall
# please do not ask us to add additional ports/services to this default configuration
*filter
:INPUT ACCEPT [0:0]
:FORWARD ACCEPT [0:0]
:OUTPUT ACCEPT [0:0]
-A INPUT -m state --state RELATED,ESTABLISHED -j ACCEPT
-A INPUT -p icmp -j ACCEPT
-A INPUT -i lo -j ACCEPT
-A INPUT -p tcp -m state --state NEW -m tcp --dport 22 -j ACCEPT
-A INPUT -p tcp -m state --state NEW -m tcp --dport 80 -j ACCEPT
-A INPUT -p tcp -m state --state NEW -m tcp --dport 443 -j ACCEPT
-A INPUT -p tcp -m state --state NEW -m tcp --dport 3306 -j ACCEPT
-A INPUT -j REJECT --reject-with icmp-host-prohibited
-A FORWARD -j REJECT --reject-with icmp-host-prohibited
COMMIT
ctrl+o #保存
ctrl+x #退出
/sbin/iptables-restore < /etc/sysconfig/iptables #使防火墙规则生效
特别注意:
1、修改完防火墙规则文件/etc/sysconfig/iptables后,需要再次执行
/sbin/iptables-restore < /etc/sysconfig/iptables命令,防火墙规则才能生效。
2、系统重启后,防火墙默认不会开机启动,需要再次执行/sbin/iptables-restore < /etc/sysconfig/iptables命令,防火墙规则才能生效。
3、如果要临时关闭防火墙,需要清空/etc/sysconfig/iptables配置文件,再次执行/sbin/iptables-restore < /etc/sysconfig/iptables命令。
4、如果要再次开启防火墙,需要恢复/etc/sysconfig/iptables配置文件,再次执行/sbin/iptables-restore < /etc/sysconfig/iptables命令。
1.2添加防火墙管理脚本
nano /etc/init.d/iptables #编辑添加脚本
#脚本中的IPTABLES_CONFIG=/etc/sysconfig/iptables是防火墙配置规则文件的路径。
#!/bin/sh -e
### BEGIN INIT INFO
# Provides: iptables
# Required-Start: mountvirtfs ifupdown $local_fs
# Default-Start: S
# Default-Stop: 0 6
### END INIT INFO
# July 9, 2007
# James B. Crocker <ubuntu@james.crocker.name>
# Creative Commons Attribution - Share Alike 3.0 License (BY,SA)
# Script to load/unload/save iptables firewall settings.
PATH="/usr/local/sbin:/usr/local/bin:/sbin:/bin:/usr/sbin:/usr/bin"
IPTABLES=/sbin/iptables
IPTABLES_SAVE=/sbin/iptables-save
IPTABLES_RESTORE=/sbin/iptables-restore
IPTABLES_CONFIG=/etc/sysconfig/iptables
[ -x $IPTABLES ] || exit 0
. /lib/lsb/init-functions
case "$1" in
start)
log_action_begin_msg "Starting firewall"
type usplash_write >/dev/null 2>/dev/null && usplash_write "TIMEOUT 120" || true
if $IPTABLES_RESTORE < $IPTABLES_CONFIG ; then
log_action_end_msg $?
else
log_action_end_msg $?
fi
type usplash_write >/dev/null 2>/dev/null && usplash_write "TIMEOUT 15" || true
;;
stop)
log_action_begin_msg "Saving current firewall configuration"
if $IPTABLES_SAVE > $IPTABLES_CONFIG ; then
log_action_end_msg $?
else
log_action_end_msg $?
fi
log_action_begin_msg "Flushing ALL firewall rules from chains!"
if $IPTABLES -F ; then
log_action_end_msg $?
else
log_action_end_msg $?
fi
log_action_begin_msg "Deleting ALL firewall chains [Warning: ACCEPTING ALL PORT SERVICES!]"
if $IPTABLES -X ; then
$IPTABLES -P INPUT ACCEPT
$IPTABLES -P FORWARD ACCEPT
$IPTABLES -P OUTPUT ACCEPT
log_action_end_msg $?
else
log_action_end_msg $?
fi
;;
save)
log_action_begin_msg "Saving current firewall configuration"
if $IPTABLES_SAVE > $IPTABLES_CONFIG ; then
log_action_end_msg $?
else
log_action_end_msg $?
fi
;;
force-reload|restart)
log_action_begin_msg "Reloading firewall configuration [Warning: POTENTIAL NETWORK INSECURITY DURING RELOAD]"
$IPTABLES -F
$IPTABLES -X
if $IPTABLES_RESTORE < $IPTABLES_CONFIG ; then
log_action_end_msg $?
else
log_action_end_msg $?
fi
;;
*)
echo "Usage: /etc/init.d/iptables {start|stop|save|restart|force-reload}"
exit 1
;;
esac
exit 0
ctrl+o #保存
ctrl+x #退出
chmod +x /etc/init.d/iptables #添加执行权限
update-rc.d iptables defaults 99 #添加服务
systemctl start iptables.service #启动
service iptables stop #停止
#现在就可以使用上面的命令管理防火墙了,启动、停止
#如果修改了防火墙配置规则,还是需要执行/sbin/iptables-restore < /etc/sysconfig/iptables命令使其生效,然后再使用防火墙管理脚本进行管理
1.3设置防火墙开机启动
1.3.1使用系统启动脚本进行设置
cp /lib/systemd/system/rc-local.service /lib/systemd/system/rc-local.service-bak #备份
ln -s /lib/systemd/system/rc-local.service /etc/systemd/system/ #创建软连接文件
nano /lib/systemd/system/rc-local.service #添加[Install]段到最后
# SPDX-License-Identifier: LGPL-2.1+
#
# This file is part of systemd.
#
# systemd is free software; you can redistribute it and/or modify it
# under the terms of the GNU Lesser General Public License as published by
# the Free Software Foundation; either version 2.1 of the License, or
# (at your option) any later version.
# This unit gets pulled automatically into multi-user.target by
# systemd-rc-local-generator if /etc/rc.local is executable.
[Unit]
Description=/etc/rc.local Compatibility
Documentation=man:systemd-rc-local-generator(8)
ConditionFileIsExecutable=/etc/rc.local
After=network.target
[Service]
Type=forking
ExecStart=/etc/rc.local start
TimeoutSec=0
RemainAfterExit=yes
GuessMainPID=no
[Install]
WantedBy=multi-user.target
Alias=rc-local.service
ctrl+o #保存
ctrl+x #退出
nano /etc/rc.local #创建文件,添加防火墙启动命令
#!/bin/bash
/sbin/iptables-restore < /etc/sysconfig/iptables
ctrl+o #保存
ctrl+x #退出
chmod +x /etc/rc.local #添加执行权限
#重新启动系统进行测试,现在防火墙已经开机自启动了
1.3.2使用sysv-rc-conf服务设置开机启动
apt-get install sysv-rc-conf #安装
cp /usr/sbin/sysv-rc-conf /usr/sbin/chkconfig #拷贝
sysv-rc-conf iptables on #设置开机启动
chkconfig iptables on
sysv-rc-conf #查看启动服务
#如果使用apt-get无法直接安装sysv-rc-conf,则修改apt-get源
cp /etc/apt/sources.list /etc/apt/sources.list-bak #备份
nano /etc/apt/sources.list #编辑添加下面一行代码
deb http://ftp.de.debian.org/debian sid main
ctrl+o #保存
ctrl+x #退出
apt-get update #更新软件源索引
#重新启动系统进行测试,现在防火墙已经开机自启动了
Debian 10.9.x系统中默认是没有开启SELINUX的,无需关闭。
二、系统约定
软件源代码包存放位置:/usr/local/src
源码包编译安装位置:/usr/local/软件名字
三、下载软件包
1、下载nginx
http://nginx.org/download/nginx-1.20.1.tar.gz
2、下载MySQL
https://cdn.mysql.com//Downloads/MySQL-8.0/mysql-boost-8.0.25.tar.gz #下载带boost的安装包
http://mirrors.sohu.com/mysql/MySQL-5.7/mysql-5.7.30-linux-glibc2.12-x86_64.tar.gz
#下载解压版的mysql,编译php5.2.x需要用到此版本的mysql驱动
#由于mysql-8.0系列已经去掉了对php5.2.x的支持,所以在安装php5.2的时候我们要用到mysql-5.7的驱动文件
3、下载php
http://mirrors.sohu.com/php/php-8.0.7.tar.gz
http://mirrors.sohu.com/php/php-7.4.20.tar.gz
http://mirrors.sohu.com/php/php-7.3.28.tar.gz
http://mirrors.sohu.com/php/php-7.2.34.tar.gz
http://mirrors.sohu.com/php/php-7.1.33.tar.gz
http://mirrors.sohu.com/php/php-7.0.33.tar.gz
http://mirrors.sohu.com/php/php-5.6.40.tar.gz
http://mirrors.sohu.com/php/php-5.5.38.tar.gz
http://mirrors.sohu.com/php/php-5.4.45.tar.gz
http://mirrors.sohu.com/php/php-5.3.29.tar.gz
http://museum.php.net/php5/php-5.2.17.tar.gz
https://php-fpm.org/downloads/php-5.2.17-fpm-0.5.14.diff.gz
4、下载cmake(MySQL编译工具)
https://cmake.org/files/v3.20/cmake-3.20.2.tar.gz
5、rpcsvc-proto(编译MySQL需要)
https://github.com/thkukuk/rpcsvc-proto/releases/download/v1.4.2/rpcsvc-proto-1.4.2.tar.xz
6、下载pcre (支持nginx伪静态)
http://ftp.pcre.org/pub/pcre/pcre-8.44.tar.gz
7、下载openssl(nginx扩展)
7.1下载最新稳定版本,适用于nginx扩展https
https://www.openssl.org/source/openssl-1.1.1k.tar.gz
7.2下载旧版本,适用于php5.6.x及其以下版本编译安装openssl扩展
https://www.openssl.org/source/old/1.0.2/openssl-1.0.2u.tar.gz
8、下载zlib(nginx扩展)
http://www.zlib.net/zlib-1.2.11.tar.gz
9、下载libmcrypt(php扩展)
https://nchc.dl.sourceforge.net/project/mcrypt/Libmcrypt/2.5.8/libmcrypt-2.5.8.tar.gz
10、下载yasm(php扩展)
http://www.tortall.net/projects/yasm/releases/yasm-1.3.0.tar.gz
11、t1lib(php扩展)
http://download.freenas.org/distfiles/t1lib-5.1.2.tar.gz
12、下载gd库安装包
12.1适用于php 5.5.x及其以上版本
https://github.com/libgd/libgd/releases/download/gd-2.3.1/libgd-2.3.1.tar.gz
12.2适用于 php 5.4.x 5.3.x 5.2.x版本
https://jaist.dl.sourceforge.net/project/gd2/gd-2.0.35.tar.gz
13、libvpx(gd库需要)
https://github.com/webmproject/libvpx/archive/v1.10.0/libvpx-1.10.0.tar.gz
14、tiff(gd库需要)
http://download.osgeo.org/libtiff/tiff-4.0.7.tar.gz
15、libpng(gd库需要)
ftp://ftp.simplesystems.org/pub/libpng/png/src/libpng16/libpng-1.6.37.tar.gz
16、freetype(gd库需要)
https://download.savannah.gnu.org/releases/freetype/freetype-2.10.4.tar.gz
17、jpegsrc(gd库需要)
http://distfiles.macports.org/jpeg/jpegsrc.v9d.tar.gz
18、Boost(编译mysql需要,要与mysql版本相匹配)
https://dl.bintray.com/boostorg/release/1.73.0/source/boost_1_73_0.tar.gz
19、libzip(编译php需要)
https://libzip.org/download/libzip-1.7.3.tar.gz
20、oniguruma(编译安装php7.4.x及其以上版本需要)
https://github.com/kkos/oniguruma/archive/refs/tags/v6.9.7.1.tar.gz -O oniguruma-6.9.7.1.tar.gz
21、curl库(编译php需要)
https://curl.se/download/curl-7.77.0.tar.gz
四、安装编译工具及库文件(使用apt-get命令安装)
apt-get install debian-keyring debian-archive-keyring build-essential gcc g++ make libtool automake autoconf libmcrypt-dev libxml2-dev re2c wget cron bzip2 libzip-dev libc6-dev bison file flex m4 gawk less cpp binutils diffutils unzip tar libbz2-dev libncurses5 libncurses5-dev libevent-dev openssl libssl-dev zlibc libsasl2-dev libltdl3-dev libltdl-dev zlib1g zlib1g-dev libbz2-1.0 libglib2.0-0 libglib2.0-dev libjpeg-dev libpng-dev libkrb5-dev curl libcurl3-gnutls libpcre3-dev libpq-dev libpq5 gettext libcap-dev ca-certificates libc-client2007e-dev psmisc patch git libc-ares-dev libicu-dev e2fsprogs libxslt1.1 libxslt1-dev libc-client-dev xz-utils libexpat1-dev libaio-dev libtirpc-dev python-dev libsqlite3-dev libonig-dev lsof libxpm-dev libfreetype6-dev checkinstall zip libfcgi-dev libfcgi0ldbl libmhash-dev freetds-dev libmariadbclient-dev-compat unixodbc-dev pkg-config libcurl4-openssl-dev
安装篇
以下是用putty工具远程登录到服务器,在命令行下面操作的
一、安装MySQL
1、安装rpcsvc-proto
cd /usr/local/src
xz -d rpcsvc-proto-1.4.2.tar.xz
tar xvf rpcsvc-proto-1.4.2.tar
cd rpcsvc-proto-1.4.2
./configure
make
make install
2、安装cmake
cd /usr/local/src
tar zxvf cmake-3.20.2.tar.gz
cd cmake-3.20.2
./configure
make
make install
3、安装MySQL
3.1、安装带boost的安装包
groupadd mysql #添加mysql组
useradd -g mysql mysql -s /bin/false #创建用户mysql并加入到mysql组,不允许mysql用户直接登录系统
mkdir -p /data/mysql #创建MySQL数据库存放目录
chown -R mysql:mysql /data/mysql #设置MySQL数据库存放目录权限
mkdir -p /usr/local/mysql #创建MySQL安装目录
cd /usr/local/src #进入软件包存放目录
tar zxvf mysql-boost-8.0.25.tar.gz #解压
cd mysql-8.0.25 #进入目录
cmake . -DCMAKE_INSTALL_PREFIX=/usr/local/mysql -DINSTALL_DATADIR=/data/mysql -DMYSQL_USER=mysql -DMYSQL_UNIX_ADDR=/tmp/mysqld.sock -DDEFAULT_CHARSET=utf8 -DDEFAULT_COLLATION=utf8_general_ci -DWITH_INNOBASE_STORAGE_ENGINE=1 -DWITH_EMBEDDED_SERVER=1 -DFORCE_INSOURCE_BUILD=1 -DWITH_MYISAM_STORAGE_ENGINE=1 -DENABLED_LOCAL_INFILE=1 -DEXTRA_CHARSETS=all -DDOWNLOAD_BOOST=1 -DWITH_BOOST=/usr/local/src/mysql-8.0.25/boost -DCMAKE_C_COMPILER=/usr/bin/gcc -DCMAKE_CXX_COMPILER=/usr/bin/g++
#配置,建议根分区在40GB以上,MySQL在配置安装过程中大约需要30GB左右的磁盘空间,安装完成之后又会释放一些空间,安装过程比较慢需要耐心等待。
make #编译
make install #安装
3.2开始配置MySQL数据库
rm -rf /etc/my.cnf /etc/mysql/my.cnf #删除系统默认的配置文件(如果默认没有就不用删除)
cd /usr/local/mysql #进入MySQL安装目录
./bin/mysqld --user=mysql --initialize --basedir=/usr/local/mysql --datadir=/data/mysql #生成mysql系统数据库
--initialize表示默认生成密码, --initialize-insecure 表示不生成密码, 密码为空。
看到这一行[Note] [MY-010454] [Server] A temporary password is generated for root@localhost: at2stlV;L9J<
记录下自动生成的mysql管理员root账号登录密码at2stlV;L9J<
mkdir -p /usr/local/mysql/etc/ #创建mysql配置文件目录
nano /usr/local/mysql/etc/my.cnf #mysql 8.0.x默认没有配置文件,我们自己创建一个。
[mysqld]
port=3306
tmpdir = /tmp
datadir=/data/mysql
socket=/tmp/mysql.sock
user=mysql
symbolic-links=0
key_buffer_size=16M
max_allowed_packet=128M
default_authentication_plugin=mysql_native_password
open_files_limit = 60000
explicit_defaults_for_timestamp
server-id = 1
character-set-server = utf8
federated
max_connections = 1000
max_connect_errors = 100000
interactive_timeout = 86400
wait_timeout = 86400
sync_binlog=0
back_log=100
default-storage-engine = InnoDB
log_slave_updates = 1
key_buffer_size=16M
[mysqldump]
quick
[mysqld_safe]
log-error=/var/log/mysqld.log
pid-file=/var/run/mysqld/mysqld.pid
[mysqld-8.0]
sql_mode=TRADITIONAL
[mysqladmin]
force
[client]
password="my password"
port=3306
socket=/tmp/mysql.sock
ctrl+o #保存配置
ctrl+x #退出
mkdir -p /etc/rc.d/
ln -s /etc/init.d /etc/rc.d/ #添加软连接
ln -s /usr/local/mysql/etc/my.cnf /etc/my.cnf #添加到/etc目录的软连接
cp /usr/local/mysql/support-files/mysql.server /etc/init.d/mysqld #把Mysql加入系统启动
chmod 755 /etc/init.d/mysqld #增加执行权限
apt-get remove insserv #卸载
update-rc.d mysqld defaults 99#加入开机启动
nano /etc/rc.d/init.d/mysqld #编辑
basedir=/usr/local/mysql #MySQL程序安装路径
datadir=/data/mysql #MySQl数据库存放目录
ctrl+o #保存配置
ctrl+x #退出
systemctl daemon-reload #重启服务
service mysqld start #启动
systemctl restart mysqld.service #重启
nano /etc/profile #把mysql服务加入系统环境变量:在最后添加下面这一行
export PATH=$PATH:/usr/local/mysql/bin
ctrl+o #保存配置
ctrl+x #退出
source /etc/profile #使配置立刻生效
下面这两行把myslq的库文件链接到系统默认的位置,这样你在编译类似PHP等软件时可以不用指定mysql的库文件地址。
ln -s /usr/local/mysql/lib/mysql /usr/lib/mysql
ln -s /usr/local/mysql/include/mysql/* /usr/include/mysql/
mkdir /var/lib/mysql #创建目录
mkdir -p /var/lib/mysql/
ln -s /tmp/mysql.sock /var/lib/mysql/mysql.sock #添加软链接
mysql -u root -p #输入之前生成的密码tL/OOv(58%fn回车
ALTER USER 'root'@'localhost' IDENTIFIED BY '123456' PASSWORD EXPIRE NEVER; #修改密码,NEVER表示密码永不过期
ALTER USER 'root'@'localhost' IDENTIFIED WITH mysql_native_password BY '123456' PASSWORD EXPIRE NEVER; #使用WITH mysql_native_password加密
#MySQL 8.0.x默认加密方式从mysql_native_password 更改为 caching_sha2_password,mysql8.0.x之前的客户端远程连接可能报错:authentication plugin caching_sha2
flush privileges; #刷新系统授权表
exit #退出mysql控制台
4、创建MySQL数据库、添加用户并授权
数据库名称:www.osyunwei.com
数据库用户名:osyunwei.com
数据库密码:osyunwei
授权osyunwei.com用户对www.osyunwei.com具有全部操作权限
继续在mysql控制台操作
mysql -u root -p #输入刚刚修改过的密码123456,回车
4.1、Create DATABASE IF NOT EXISTS `www.osyunwei.com` default charset utf8 COLLATE utf8_general_ci; #创建数据库
4.2、CREATE USER 'osyunwei.com'@'localhost' IDENTIFIED BY 'osyunwei'; #创建用户
CREATE USER 'osyunwei.com'@'127.0.0.1' IDENTIFIED WITH mysql_native_password BY 'osyunwei'; #加密方式为mysql_native_password
4.3、grant all privileges on `www.osyunwei.com`.* to 'osyunwei.com'@'localhost'; #授权用户osyunwei.com对数据库www.osyunwei.com具有全部操作权限
grant all privileges on `www.osyunwei.com`.* to 'osyunwei.com'@'127.0.0.1'; #授权用户
GRANT ALL PRIVILEGES ON *.* TO 'root'@'localhost' WITH GRANT OPTION; #授权root用户具有全部数据库本地权限
4.4、MySQL5.7版本后要授权用户对所有数据库有SUPER权限,否则上一步对用户的授权只能连接但无任何操作权限。
grant SUPER on *.* to 'osyunwei.com'@'localhost' ; #授予用户对所有数据库有SUPER权限,否则只能连接无任何操作权限。
grant SUPER on *.* to 'osyunwei.com'@'127.0.0.1' ;
flush privileges; #刷新系统授权表
exit #退出mysql控制台
service mysqld restart #重启mysql数据库
二、安装Nginx
1、安装pcre
cd /usr/local/src
mkdir /usr/local/pcre
tar zxvf pcre-8.44.tar.gz
cd pcre-8.44
./configure --prefix=/usr/local/pcre
make
make install
2、安装openssl
cd /usr/local/src
mkdir /usr/local/openssl
tar zxvf openssl-1.1.1k.tar.gz
cd openssl-1.1.1k
./config -fPIC shared zlib --prefix=/usr/local/openssl/ enable-ec_nistp_64_gcc_128
./config -t
make
make install
ln -s /usr/local/openssl/lib /usr/local/openssl/lib/x86_64-linux-gnu #添加软连接
3、安装zlib
cd /usr/local/src
mkdir /usr/local/zlib
tar zxvf zlib-1.2.11.tar.gz
cd zlib-1.2.11
./configure --prefix=/usr/local/zlib
make
make install
4、安装Nginx
groupadd www
useradd -g www www -s /bin/false
cd /usr/local/src
tar zxvf nginx-1.20.1.tar.gz
cd nginx-1.20.1
./configure --prefix=/usr/local/nginx --without-http_memcached_module --user=www --group=www --with-http_stub_status_module --with-http_ssl_module --with-http_gzip_static_module --with-openssl=/usr/local/src/openssl-1.1.1k --with-zlib=/usr/local/src/zlib-1.2.11 --with-pcre=/usr/local/src/pcre-8.44
注意:--with-openssl=/usr/local/src/openssl-1.1.1k --with-zlib=/usr/local/src/zlib-1.2.11 --with-pcre=/usr/local/src/pcre-8.44指向的是源码包解压的路径,而不是安装的路径,否则会报错
make #编译
make install #安装
/usr/local/nginx/sbin/nginx #启动Nginx
设置nginx开机启动
nano /lib/systemd/system/nginx.service #添加以下代码
[Unit]
Description=The NGINX HTTP and reverse proxy server
After=syslog.target network.target remote-fs.target nss-lookup.target
[Service]
Type=forking
PIDFile=/usr/local/nginx/logs/nginx.pid
ExecStartPre=/usr/local/nginx/sbin/nginx -t
ExecStart=/usr/local/nginx/sbin/nginx
ExecReload=/usr/local/nginx/sbin/nginx -s reload
ExecStop=/bin/kill -s QUIT $MAINPID
ExecStartPost=/bin/sleep 0.1
PrivateTmp=true
[Install]
WantedBy=multi-user.target
ctrl+o #保存配置
ctrl+x #退出
/usr/local/nginx/sbin/nginx -s stop #停止
systemctl enable nginx.service #设置开机自启动
systemctl start nginx.service #启动
systemctl stop nginx.service #关闭
systemctl restart nginx.service #重启
systemctl reload nginx.service #重新加载配置文件
打开浏览器,输入服务器ip地址,看到如下界面,表示Nginx安装成功

三、安装php
(一):安装php依赖包
1、安装yasm
cd /usr/local/src
tar zxvf yasm-1.3.0.tar.gz
cd yasm-1.3.0
./configure
make
make install
2、安装libmcrypt
cd /usr/local/src
tar zxvf libmcrypt-2.5.8.tar.gz
cd libmcrypt-2.5.8
./configure
make
make install
3、安装libvpx
cd /usr/local/src
tar zxvf libvpx-1.10.0.tar.gz
cd libvpx-1.10.0
./configure --prefix=/usr/local/libvpx --enable-shared --enable-vp9
make
make install
4、安装tiff
cd /usr/local/src
tar zxvf tiff-4.0.7.tar.gz
cd tiff-4.0.7
./configure --prefix=/usr/local/tiff --enable-shared
make
make install
5、安装libpng
cd /usr/local/src
tar zxvf libpng-1.6.37.tar.gz #解压
xz -d libpng-1.6.37.tar.xz #先解压xz
tar xvf libpng-1.6.37.tar #再解压tar
或者
tar xvJf libpng-1.6.37.tar.xz #直接解压
cd libpng-1.6.37
./configure --prefix=/usr/local/libpng --enable-shared
make
make install
6、安装freetype
cd /usr/local/src
tar zxvf freetype-2.10.4.tar.gz
cd freetype-2.10.4
./configure --prefix=/usr/local/freetype --enable-shared --enable-freetype-config
make
make install
cp /usr/local/freetype/lib/pkgconfig/freetype2.pc /usr/lib/pkgconfig/ #拷贝文件
ln -sf /usr/local/freetype/include/freetype2/* /usr/include/ #添加软连接
ln -sf /usr/local/freetype/include/freetype2/* /usr/local/include #添加软连接
nano /etc/ld.so.conf.d/freetype.conf #编辑文件
/usr/local/freetype/lib
ctrl+o #保存配置
ctrl+x #退出
#或者运行下面三行命令添加
cat > /etc/ld.so.conf.d/freetype.conf<<EOF
/usr/local/freetype/lib
EOF
ldconfig #更新动态链接库
7、安装jpeg
cd /usr/local/src
tar zxvf jpegsrc.v9d.tar.gz
cd jpeg-9d
./configure --prefix=/usr/local/jpeg --enable-shared
make
make install
8、安装GD库
8.1安装新版本libgd,适用于php5.5.x及其以上版本
apt-get install libxpm-dev
apt-get install libfreetype6-dev
#检查上面两个依赖包是否安装,安装GD库需要
cd /usr/local/src
tar zxvf libgd-2.3.1.tar.gz
cd libgd-2.3.1
./configure --prefix=/usr/local/libgd --enable-shared --with-jpeg=/usr/local/jpeg --with-png=/usr/local/libpng --with-freetype=/usr/local/freetype --with-fontconfig=/usr/local/freetype --with-xpm=/usr/lib64 --with-tiff=/usr/local/tiff
make
make install
8.2安装旧版本gd库,适用于php5.4x及其以下版本
cd /usr/local/src
tar zxvf gd-2.0.35.tar.gz
cd gd-2.0.35
./configure --prefix=/usr/local/gd --enable-shared --with-jpeg=/usr/local/jpeg --with-png=/usr/local/libpng --with-freetype=/usr/local/freetype --with-fontconfig=/usr/local/freetype --with-xpm=/usr/lib64 --with-tiff=/usr/local/tiff --with-vpx=/usr/local/libvpx
make
make install
9、安装t1lib
cd /usr/local/src
tar zxvf t1lib-5.1.2.tar.gz
cd t1lib-5.1.2
./configure --prefix=/usr/local/t1lib --enable-shared
make without_doc
make install
10、安装libzip
cd /usr/local/src
tar -zxvf libzip-1.7.3.tar.gz
cd libzip-1.7.3
mkdir build
cd build
cmake ..
make
make install
11、安装oniguruma #编译安装php7.4.x需要
cd /usr/local/src
tar -zxf oniguruma-6.9.7.1.tar.gz
cd oniguruma-6.9.7.1
./autogen.sh
./configure --prefix=/usr
make
make install
12、安装低版本openssl #适用于编译php5.6.x及其以下版本
系统默认的openssl版本太高,与php 5.6.x及其以下版本不兼容,需要降低openssl版本才能编译成功
cd /usr/local/src
mkdir /usr/local/ssl
tar zxvf openssl-1.0.2u.tar.gz
cd openssl-1.0.2u
./config -fPIC shared zlib --openssldir=/usr/local/ssl/ enable-ec_nistp_64_gcc_128
make depend
make
make install
ln -s /usr/local/ssl/lib /usr/local/ssl/lib/x86_64-linux-gnu #添加软连接
注意:带shared参数才能生成libssl.so动态链接库文件,安装curl时, --with-ssl=/usr/local/ssl 才能找到动态链接库,curl才能开启ssl模块
13、安装curl模块
cd /usr/local/src
mkdir /usr/local/curl
tar zxvf curl-7.77.0.tar.gz
cd curl-7.77.0
env PKG_CONFIG_PATH=/usr/local/ssl/lib/pkgconfig LDFLAGS=-Wl,-rpath=/usr/local/ssl/lib
./configure --without-nss --with-ssl=/usr/local/ssl --with-zlib --prefix=/usr/local/curl
make
make install
(二):编译安装php
注意:请执行以下两条命令,否则安装php可能会出错。
\cp -frp /usr/lib/x86_64-linux-gnu/libXpm.so* /usr/lib/
\cp -frp /usr/lib/x86_64-linux-gnu/libltdl.so* /usr/lib/
2.52、安装php5.2.17
cd /usr/local/src
tar zxvf mysql-5.7.30-linux-glibc2.12-x86_64.tar.gz #解压
mv mysql-5.7.30-linux-glibc2.12-x86_64 /usr/local/mysql57 #移动目录到到/usr/local/mysql57下
cd /usr/local/src
tar zxvf php-5.2.17.tar.gz
gunzip php-5.2.17-fpm-0.5.14.diff.gz
patch -d php-5.2.17 -p1 < php-5.2.17-fpm-0.5.14.diff #给php源码打上fpm补丁
curl -o php-5.2.17.patch https://mail.gnome.org/archives/xml/2012-August/txtbgxGXAvz4N.txt
cd php-5.2.17
patch -p0 -b <../php-5.2.17.patch
./configure --prefix=/usr/local/php52 --with-config-file-path=/usr/local/php52/etc --with-mysql=/usr/local/mysql57 --with-mysqli=/usr/local/mysql57/bin/mysql_config --with-mysql-sock=/tmp/mysql.sock --with-pdo-mysql=/usr/local/mysql57 --with-gd=/usr/local/gd --with-freetype-dir=/usr/local/freetype --with-jpeg-dir=/usr/local/jpeg --with-png-dir=/usr/local/libpng --with-iconv --with-zlib --enable-xml --enable-discard-path --enable-magic-quotes --enable-safe-mode --enable-bcmath --enable-shmop --enable-sysvsem --enable-inline-optimization --with-curlwrappers --enable-mbregex --enable-fastcgi --enable-fpm --enable-force-cgi-redirect --enable-mbstring --enable-ftp --enable-gd-native-ttf --with-openssl=/usr/local/ssl --enable-pcntl --enable-sockets --with-xmlrpc --enable-zip --enable-soap --without-pear --with-gettext --with-mime-magic --enable-session --with-mcrypt --with-curl=/usr/local/curl --enable-ctype --with-mysqli=shared #配置,注意mysql路径是/usr/local/mysql57
make
make install
cp /usr/local/src/php-5.2.17/php.ini-dist /usr/local/php52/etc/php.ini #复制php配置文件到安装目录
#rm -rf /etc/php.ini #删除默认配置文件
#ln -s /usr/local/php52/etc/php.ini /etc/php.ini #创建链接到系统默认的位置
nano /usr/local/php52/etc/php-fpm.conf
<value name="listen_address">127.0.0.1:9006</value>
<value name="user">www</value> #去掉注释,修改用户为www
<value name="group">www</value> #去掉注释,修改用户组为www
ctrl+o #保存
ctrl+x #退出
设置 php-fpm开机启动
cp /usr/local/php52/sbin/php-fpm /etc/rc.d/init.d/php52-fpm
mv /usr/local/php52/sbin/php-fpm /usr/local/php52/sbin/php52-fpm
nano /etc/rc.d/init.d/php52-fpm
在#!/bin/bash下面添加两行
#chkconfig:345 62 62
#description:php-fpm
php_fpm_BIN=/usr/local/php52/bin/php-cgi
php_fpm_CONF=/usr/local/php52/etc/php-fpm.conf
php_fpm_PID=/usr/local/php52/logs/php-fpm.pid
ctrl+o #保存
ctrl+x #退出
chmod 775 /etc/rc.d/init.d/php52-fpm #赋予文件执行权限
update-rc.d php52-fpm defaults 99 #设置开机启动
chkconfig php52-fpm on #设置开机启动
/usr/local/php52/sbin/php52-fpm start
service php52-fpm start
nano /usr/local/php52/etc/php.ini #添加mysqli扩展,在最后一行添加
extension="/usr/local/php52/lib/php/extensions/no-debug-non-zts-20060613/mysqli.so"
ctrl+o #保存
ctrl+x #退出
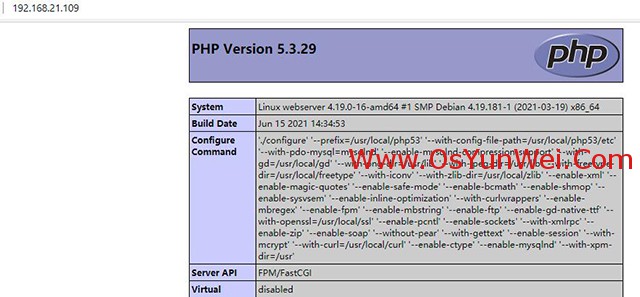
2.53、安装php5.3.x
cd /usr/local/src
tar -zvxf php-5.3.29.tar.gz
cd php-5.3.29
./configure --prefix=/usr/local/php53 --with-config-file-path=/usr/local/php53/etc --with-pdo-mysql=mysqlnd --enable-mysqlnd-compression-support --with-gd=/usr/local/gd --with-png-dir=/usr/lib --with-jpeg-dir=/usr/lib --with-freetype-dir=/usr/local/freetype --with-iconv --with-zlib-dir=/usr/local/zlib --enable-xml --enable-magic-quotes --enable-safe-mode --enable-bcmath --enable-shmop --enable-sysvsem --enable-inline-optimization --with-curlwrappers --enable-mbregex --enable-fpm --enable-mbstring --enable-ftp --enable-gd-native-ttf --with-openssl=/usr/local/ssl --enable-pcntl --enable-sockets --with-xmlrpc --enable-zip --enable-soap --without-pear --with-gettext --enable-session --with-mcrypt --with-curl=/usr/local/curl --enable-ctype --enable-mysqlnd --with-xpm-dir=/usr
make #编译
make install #安装
cp php.ini-production /usr/local/php53/etc/php.ini #复制php配置文件到安装目录
#rm -rf /etc/php.ini #删除系统自带配置文件
#ln -s /usr/local/php53/etc/php.ini /etc/php.ini #添加软链接
cp /usr/local/php53/etc/php-fpm.conf.default /usr/local/php53/etc/php-fpm.conf #拷贝模板文件为php-fpm配置文件
nano /usr/local/php53/etc/php-fpm.conf #编辑
user = www #设置php-fpm运行账号为www
group = www #设置php-fpm运行组为www
pid = run/php-fpm.pid #取消前面的分号
listen = 127.0.0.1:9053
ctrl+o #保存
ctrl+x #退出
设置 php-fpm开机启动
cp /usr/local/src/php-5.3.29/sapi/fpm/init.d.php-fpm /etc/rc.d/init.d/php53-fpm #拷贝php-fpm到启动目录
chmod +x /etc/rc.d/init.d/php53-fpm #添加执行权限
update-rc.d php53-fpm defaults 99 #设置开机启动
systemctl daemon-reload #重新加载配置
nano /etc/rc.d/init.d/php53-fpm
prefix=/usr/local/php53
php_fpm_BIN=${exec_prefix}/sbin/php53-fpm
ctrl+o #保存
ctrl+x #退出
mv /usr/local/php53/sbin/php-fpm /usr/local/php53/sbin/php53-fpm
service php53-fpm start #启动
nano /usr/local/php53/etc/php.ini #编辑配置文件
找到:disable_functions =
修改为:disable_functions = passthru,exec,system,chroot,scandir,chgrp,chown,shell_exec,proc_open,proc_get_status,ini_alter,ini_alter,ini_restore,dl,openlog,syslog,readlink,symlink,popepassthru,stream_socket_server,escapeshellcmd,dll,popen,disk_free_space,checkdnsrr,checkdnsrr,getservbyname,getservbyport,disk_total_space,posix_ctermid,posix_get_last_error,posix_getcwd, posix_getegid,posix_geteuid,posix_getgid, posix_getgrgid,posix_getgrnam,posix_getgroups,posix_getlogin,posix_getpgid,posix_getpgrp,posix_getpid, posix_getppid,posix_getpwnam,posix_getpwuid, posix_getrlimit, posix_getsid,posix_getuid,posix_isatty, posix_kill,posix_mkfifo,posix_setegid,posix_seteuid,posix_setgid, posix_setpgid,posix_setsid,posix_setuid,posix_strerror,posix_times,posix_ttyname,posix_uname
#列出PHP可以禁用的函数,如果某些程序需要用到这个函数,可以删除,取消禁用
找到:;date.timezone =
修改为:date.timezone = PRC #设置时区
找到:expose_php = On
修改为:expose_php = OFF #禁止显示php版本的信息
找到:short_open_tag = Off
修改为:short_open_tag = ON #支持php短标签
ctrl+o #保存
ctrl+x #退出
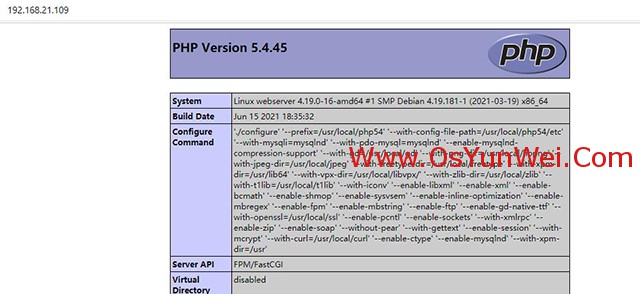
2.54、安装php5.4.x
nano /usr/local/gd/include/gd_io.h #添加void (*data);
typedef struct gdIOCtx
{
int (*getC) (struct gdIOCtx *);
int (*getBuf) (struct gdIOCtx *, void *, int);
void (*putC) (struct gdIOCtx *, int);
int (*putBuf) (struct gdIOCtx *, const void *, int);
/* seek must return 1 on SUCCESS, 0 on FAILURE. Unlike fseek! */
int (*seek) (struct gdIOCtx *, const int);
long (*tell) (struct gdIOCtx *);
void (*gd_free) (struct gdIOCtx *);
void (*data);
}
gdIOCtx;
ctrl+o #保存
ctrl+x #退出
cd /usr/local/src
tar -zvxf php-5.4.45.tar.gz
cd php-5.4.45
export LD_LIBRARY_PATH=/usr/local/gd/lib
./configure --prefix=/usr/local/php54 --with-config-file-path=/usr/local/php54/etc --with-mysqli=mysqlnd --with-pdo-mysql=mysqlnd --enable-mysqlnd-compression-support --with-gd=/usr/local/gd --with-png-dir=/usr/local/libpng --with-jpeg-dir=/usr/local/jpeg --with-freetype-dir=/usr/local/freetype --with-xpm-dir=/usr/lib64 --with-vpx-dir=/usr/local/libvpx/ --with-zlib-dir=/usr/local/zlib --with-t1lib=/usr/local/t1lib --with-iconv --enable-libxml --enable-xml --enable-bcmath --enable-shmop --enable-sysvsem --enable-inline-optimization --enable-mbregex --enable-fpm --enable-mbstring --enable-ftp --enable-gd-native-ttf --with-openssl=/usr/local/ssl --enable-pcntl --enable-sockets --with-xmlrpc --enable-zip --enable-soap --without-pear --with-gettext --enable-session --with-mcrypt --with-curl=/usr/local/curl --enable-ctype --enable-mysqlnd --with-xpm-dir=/usr
make #编译
make install #安装
cp php.ini-production /usr/local/php54/etc/php.ini #复制php配置文件到安装目录
#rm -rf /etc/php.ini #删除系统自带配置文件
#ln -s /usr/local/php54/etc/php.ini /etc/php.ini #添加软链接到 /etc目录
cp /usr/local/php54/etc/php-fpm.conf.default /usr/local/php54/etc/php-fpm.conf #拷贝模板文件为php-fpm配置文件
#ln -s /usr/local/php/etc/php-fpm.conf /etc/php-fpm.conf #添加软连接到 /etc目录
nano /usr/local/php54/etc/php-fpm.conf #编辑
user = www #设置php-fpm运行账号为www
group = www #设置php-fpm运行组为www
pid = run/php-fpm.pid #取消前面的分号
listen = 127.0.0.1:9054
ctrl+o #保存
ctrl+x #退出
设置 php-fpm开机启动
cp /usr/local/src/php-5.4.45/sapi/fpm/init.d.php-fpm /etc/rc.d/init.d/php54-fpm #拷贝php-fpm到启动目录
chmod +x /etc/rc.d/init.d/php54-fpm #添加执行权限
systemctl enable php54-fpm.service #设置开机启动
nano /etc/rc.d/init.d/php54-fpm
prefix=/usr/local/php54
php_fpm_BIN=${exec_prefix}/sbin/php54-fpm
ctrl+o #保存
ctrl+x #退出
mv /usr/local/php54/sbin/php-fpm /usr/local/php54/sbin/php54-fpm
systemctl daemon-reload #重新加载配置
service php54-fpm start #启动
nano /usr/local/php54/etc/php.ini #编辑配置文件
找到:disable_functions =
修改为:disable_functions = passthru,exec,system,chroot,scandir,chgrp,chown,shell_exec,proc_open,proc_get_status,ini_alter,ini_alter,ini_restore,dl,openlog,syslog,readlink,symlink,popepassthru,stream_socket_server,escapeshellcmd,dll,popen,disk_free_space,checkdnsrr,checkdnsrr,getservbyname,getservbyport,disk_total_space,posix_ctermid,posix_get_last_error,posix_getcwd, posix_getegid,posix_geteuid,posix_getgid, posix_getgrgid,posix_getgrnam,posix_getgroups,posix_getlogin,posix_getpgid,posix_getpgrp,posix_getpid, posix_getppid,posix_getpwnam,posix_getpwuid, posix_getrlimit, posix_getsid,posix_getuid,posix_isatty, posix_kill,posix_mkfifo,posix_setegid,posix_seteuid,posix_setgid, posix_setpgid,posix_setsid,posix_setuid,posix_strerror,posix_times,posix_ttyname,posix_uname
#列出PHP可以禁用的函数,如果某些程序需要用到这个函数,可以删除,取消禁用。
找到:;date.timezone =
修改为:date.timezone = PRC #设置时区
找到:expose_php = On
修改为:expose_php = Off #禁止显示php版本的信息
找到:short_open_tag = Off
修改为:short_open_tag = ON #支持php短标签
找到opcache.enable=0
修改为opcache.enable=1 #php支持opcode缓存
找到:opcache.enable_cli=1 #php支持opcode缓存
修改为:opcache.enable_cli=0
在最后一行添加:zend_extension=opcache.so #开启opcode缓存功能
ctrl+o #保存
ctrl+x #退出
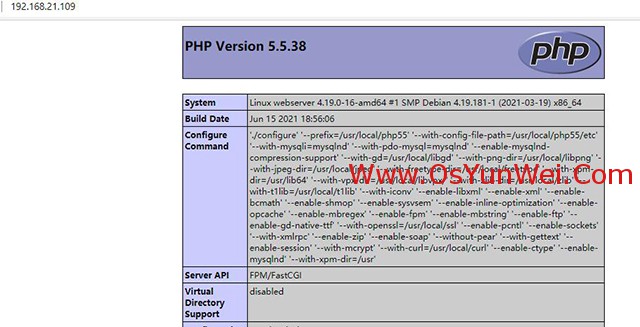
2.55、安装php5.5.x
cd /usr/local/src
tar -zvxf php-5.5.38.tar.gz
cd php-5.5.38
export LD_LIBRARY_PATH=/usr/local/libgd/lib
./configure --prefix=/usr/local/php55 --with-config-file-path=/usr/local/php55/etc --with-mysqli=mysqlnd --with-pdo-mysql=mysqlnd --enable-mysqlnd-compression-support --with-gd=/usr/local/libgd --with-png-dir=/usr/local/libpng --with-jpeg-dir=/usr/local/jpeg --with-freetype-dir=/usr/local/freetype --with-xpm-dir=/usr/lib64 --with-vpx-dir=/usr/local/libvpx/ --with-zlib-dir=/usr/local/zlib --with-t1lib=/usr/local/t1lib --with-iconv --enable-libxml --enable-xml --enable-bcmath --enable-shmop --enable-sysvsem --enable-inline-optimization --enable-opcache --enable-mbregex --enable-fpm --enable-mbstring --enable-ftp --enable-gd-native-ttf --with-openssl=/usr/local/ssl --enable-pcntl --enable-sockets --with-xmlrpc --enable-zip --enable-soap --without-pear --with-gettext --enable-session --with-mcrypt --with-curl=/usr/local/curl --enable-ctype --enable-mysqlnd --with-xpm-dir=/usr
make #编译
make install #安装
cp php.ini-production /usr/local/php55/etc/php.ini #复制php配置文件到安装目录
#rm -rf /etc/php.ini #删除系统自带配置文件
#ln -s /usr/local/php55/etc/php.ini /etc/php.ini #添加软链接到 /etc目录
cp /usr/local/php55/etc/php-fpm.conf.default /usr/local/php55/etc/php-fpm.conf #拷贝模板文件为php-fpm配置文件
#ln -s /usr/local/php/etc/php-fpm.conf /etc/php-fpm.conf #添加软连接到 /etc目录
nano /usr/local/php55/etc/php-fpm.conf #编辑
user = www #设置php-fpm运行账号为www
group = www #设置php-fpm运行组为www
pid = run/php-fpm.pid #取消前面的分号
listen = 127.0.0.1:9055
ctrl+o #保存
ctrl+x #退出
设置 php-fpm开机启动
cp /usr/local/src/php-5.5.38/sapi/fpm/init.d.php-fpm /etc/rc.d/init.d/php55-fpm #拷贝php-fpm到启动目录
chmod +x /etc/rc.d/init.d/php55-fpm #添加执行权限
systemctl enable php55-fpm.service
chkconfig php55-fpm on #设置开机启动
nano /etc/rc.d/init.d/php55-fpm
prefix=/usr/local/php55
php_fpm_BIN=${exec_prefix}/sbin/php55-fpm
ctrl+o #保存
ctrl+x #退出
mv /usr/local/php55/sbin/php-fpm /usr/local/php55/sbin/php55-fpm
systemctl daemon-reload #重新加载配置
service php55-fpm start #启动
nano /usr/local/php55/etc/php.ini #编辑配置文件
找到:disable_functions =
修改为:disable_functions = passthru,exec,system,chroot,scandir,chgrp,chown,shell_exec,proc_open,proc_get_status,ini_alter,ini_alter,ini_restore,dl,openlog,syslog,readlink,symlink,popepassthru,stream_socket_server,escapeshellcmd,dll,popen,disk_free_space,checkdnsrr,checkdnsrr,getservbyname,getservbyport,disk_total_space,posix_ctermid,posix_get_last_error,posix_getcwd, posix_getegid,posix_geteuid,posix_getgid, posix_getgrgid,posix_getgrnam,posix_getgroups,posix_getlogin,posix_getpgid,posix_getpgrp,posix_getpid, posix_getppid,posix_getpwnam,posix_getpwuid, posix_getrlimit, posix_getsid,posix_getuid,posix_isatty, posix_kill,posix_mkfifo,posix_setegid,posix_seteuid,posix_setgid, posix_setpgid,posix_setsid,posix_setuid,posix_strerror,posix_times,posix_ttyname,posix_uname
#列出PHP可以禁用的函数,如果某些程序需要用到这个函数,可以删除,取消禁用。
找到:;date.timezone =
修改为:date.timezone = PRC #设置时区
找到:expose_php = On
修改为:expose_php = Off #禁止显示php版本的信息
找到:short_open_tag = Off
修改为:short_open_tag = ON #支持php短标签
找到opcache.enable=0
修改为opcache.enable=1 #php支持opcode缓存
找到:opcache.enable_cli=1 #php支持opcode缓存
修改为:opcache.enable_cli=0
在最后一行添加:zend_extension=opcache.so #开启opcode缓存功能
ctrl+o #保存
ctrl+x #退出
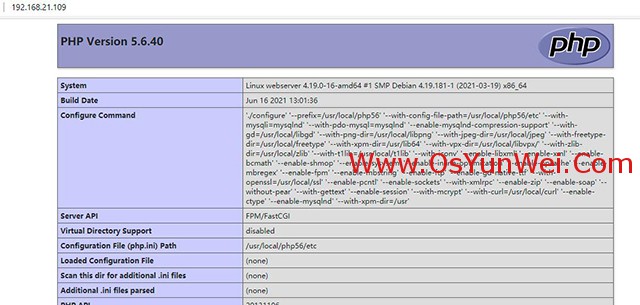
2.56、安装php5.6.x
cd /usr/local/src
tar -zvxf php-5.6.40.tar.gz
cd php-5.6.40
export LD_LIBRARY_PATH=/usr/local/libgd/lib
./configure --prefix=/usr/local/php56 --with-config-file-path=/usr/local/php56/etc --with-mysqli=mysqlnd --with-pdo-mysql=mysqlnd --enable-mysqlnd-compression-support --with-gd=/usr/local/libgd --with-png-dir=/usr/local/libpng --with-jpeg-dir=/usr/local/jpeg --with-freetype-dir=/usr/local/freetype --with-xpm-dir=/usr/lib64 --with-vpx-dir=/usr/local/libvpx/ --with-zlib-dir=/usr/local/zlib --with-t1lib=/usr/local/t1lib --with-iconv --enable-libxml --enable-xml --enable-bcmath --enable-shmop --enable-sysvsem --enable-inline-optimization --enable-opcache --enable-mbregex --enable-fpm --enable-mbstring --enable-ftp --enable-gd-native-ttf --with-openssl=/usr/local/ssl --enable-pcntl --enable-sockets --with-xmlrpc --enable-zip --enable-soap --without-pear --with-gettext --enable-session --with-mcrypt --with-curl=/usr/local/curl --enable-ctype --enable-mysqlnd --with-xpm-dir=/usr
make
make install
如果编译错误,可以清理后在编译一次
make clean #清理
make #编译
cp php.ini-production /usr/local/php56/etc/php.ini #复制php配置文件到安装目录
#rm -rf /etc/php.ini #删除系统自带配置文件
#ln -s /usr/local/php56/etc/php.ini /etc/php.ini #添加软链接到 /etc目录
cp /usr/local/php56/etc/php-fpm.conf.default /usr/local/php56/etc/php-fpm.conf #拷贝模板文件为php-fpm配置文件
#ln -s /usr/local/php56/etc/php-fpm.conf /etc/php-fpm.conf #添加软连接到 /etc目录
nano /usr/local/php56/etc/php-fpm.conf #编辑
user = www #设置php-fpm运行账号为www
group = www #设置php-fpm运行组为www
pid = run/php-fpm.pid #取消前面的分号
listen = 127.0.0.1:9056
ctrl+o #保存
ctrl+x #退出
设置 php-fpm开机启动
cp /usr/local/src/php-5.6.40/sapi/fpm/init.d.php-fpm /etc/rc.d/init.d/php56-fpm #拷贝php-fpm到启动目录
chmod +x /etc/rc.d/init.d/php56-fpm #添加执行权限
systemctl enable php56-fpm.service #设置开机启动
nano /etc/rc.d/init.d/php56-fpm
prefix=/usr/local/php56
php_fpm_BIN=${exec_prefix}/sbin/php56-fpm
ctrl+o #保存
ctrl+x #退出
mv /usr/local/php56/sbin/php-fpm /usr/local/php56/sbin/php56-fpm
systemctl daemon-reload #重新加载配置
systemctl start php56-fpm.service #启动
nano /usr/local/php56/etc/php.ini #编辑配置文件
找到:disable_functions =
修改为:disable_functions = passthru,exec,system,chroot,scandir,chgrp,chown,shell_exec,proc_open,proc_get_status,ini_alter,ini_alter,ini_restore,dl,openlog,syslog,readlink,symlink,popepassthru,stream_socket_server,escapeshellcmd,dll,popen,disk_free_space,checkdnsrr,checkdnsrr,getservbyname,getservbyport,disk_total_space,posix_ctermid,posix_get_last_error,posix_getcwd, posix_getegid,posix_geteuid,posix_getgid, posix_getgrgid,posix_getgrnam,posix_getgroups,posix_getlogin,posix_getpgid,posix_getpgrp,posix_getpid, posix_getppid,posix_getpwnam,posix_getpwuid, posix_getrlimit, posix_getsid,posix_getuid,posix_isatty, posix_kill,posix_mkfifo,posix_setegid,posix_seteuid,posix_setgid, posix_setpgid,posix_setsid,posix_setuid,posix_strerror,posix_times,posix_ttyname,posix_uname
#列出PHP可以禁用的函数,如果某些程序需要用到这个函数,可以删除,取消禁用。
找到:;date.timezone =
修改为:date.timezone = PRC #设置时区
找到:expose_php = On
修改为:expose_php = Off #禁止显示php版本的信息
找到:short_open_tag = Off
修改为:short_open_tag = ON #支持php短标签
找到opcache.enable=0
修改为opcache.enable=1 #php支持opcode缓存
找到:;opcache.enable_cli=1 #php支持opcode缓存
修改为:opcache.enable_cli=0
在最后一行添加:zend_extension=opcache.so #开启opcode缓存功能
ctrl+o #保存
ctrl+x #退出
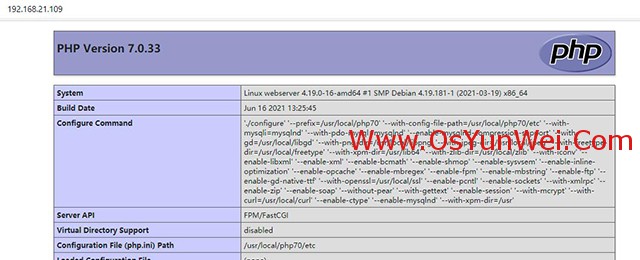
2.70、安装php7.0.x
cd /usr/local/src
tar -zvxf php-7.0.33.tar.gz
cd php-7.0.33
export LD_LIBRARY_PATH=/usr/local/libgd/lib
./configure --prefix=/usr/local/php70 --with-config-file-path=/usr/local/php70/etc --with-mysqli=mysqlnd --with-pdo-mysql=mysqlnd --enable-mysqlnd-compression-support --with-gd=/usr/local/libgd --with-png-dir=/usr/local/libpng --with-jpeg-dir=/usr/local/jpeg --with-freetype-dir=/usr/local/freetype --with-xpm-dir=/usr/lib64 --with-zlib-dir=/usr/local/zlib --with-iconv --enable-libxml --enable-xml --enable-bcmath --enable-shmop --enable-sysvsem --enable-inline-optimization --enable-opcache --enable-mbregex --enable-fpm --enable-mbstring --enable-ftp --enable-gd-native-ttf --with-openssl=/usr/local/ssl --enable-pcntl --enable-sockets --with-xmlrpc --enable-zip --enable-soap --without-pear --with-gettext --enable-session --with-mcrypt --with-curl=/usr/local/curl --enable-ctype --enable-mysqlnd --with-xpm-dir=/usr
make #编译
make install #安装
cp php.ini-production /usr/local/php70/etc/php.ini #复制php配置文件到安装目录
#rm -rf /etc/php.ini #删除系统自带配置文件
#ln -s /usr/local/php70/etc/php.ini /etc/php.ini #添加软链接到 /etc目录
cp /usr/local/php70/etc/php-fpm.conf.default /usr/local/php70/etc/php-fpm.conf #拷贝模板文件为php-fpm配置文件
#ln -s /usr/local/php70/etc/php-fpm.conf /etc/php-fpm.conf #添加软连接到 /etc目录
nano /usr/local/php70/etc/php-fpm.conf #编辑
pid = run/php-fpm.pid #取消前面的分号
include=/usr/local/php70/etc/php-fpm.d/*.conf
ctrl+o #保存
ctrl+x #退出
cp /usr/local/php70/etc/php-fpm.d/www.conf.default /usr/local/php70/etc/php-fpm.d/www.conf
nano /usr/local/php70/etc/php-fpm.d/www.conf #编辑
user = www #设置php-fpm运行账号为www
group = www #设置php-fpm运行组为www
listen = 127.0.0.1:9070
ctrl+o #保存
ctrl+x #退出
设置 php-fpm开机启动
cp /usr/local/src/php-7.0.33/sapi/fpm/init.d.php-fpm /etc/rc.d/init.d/php70-fpm #拷贝php-fpm到启动目录
chmod +x /etc/rc.d/init.d/php70-fpm #添加执行权限
systemctl enable php70-fpm.service #设置开机启动
chkconfig php70-fpm on
nano /etc/rc.d/init.d/php70-fpm
prefix=/usr/local/php70
php_fpm_BIN=${exec_prefix}/sbin/php70-fpm
ctrl+o #保存
ctrl+x #退出
mv /usr/local/php70/sbin/php-fpm /usr/local/php70/sbin/php70-fpm
systemctl daemon-reload #重新加载配置
systemctl start php70-fpm.service #启动
nano /usr/local/php70/etc/php.ini #编辑配置文件
找到:disable_functions =
修改为:disable_functions = passthru,exec,system,chroot,scandir,chgrp,chown,shell_exec,proc_open,proc_get_status,ini_alter,ini_alter,ini_restore,dl,openlog,syslog,readlink,symlink,popepassthru,stream_socket_server,escapeshellcmd,dll,popen,disk_free_space,checkdnsrr,checkdnsrr,getservbyname,getservbyport,disk_total_space,posix_ctermid,posix_get_last_error,posix_getcwd, posix_getegid,posix_geteuid,posix_getgid, posix_getgrgid,posix_getgrnam,posix_getgroups,posix_getlogin,posix_getpgid,posix_getpgrp,posix_getpid, posix_getppid,posix_getpwnam,posix_getpwuid, posix_getrlimit, posix_getsid,posix_getuid,posix_isatty, posix_kill,posix_mkfifo,posix_setegid,posix_seteuid,posix_setgid, posix_setpgid,posix_setsid,posix_setuid,posix_strerror,posix_times,posix_ttyname,posix_uname
#列出PHP可以禁用的函数,如果某些程序需要用到这个函数,可以删除,取消禁用。
找到:;date.timezone =
修改为:date.timezone = PRC #设置时区
找到:expose_php = On
修改为:expose_php = Off #禁止显示php版本的信息
找到:short_open_tag = Off
修改为:short_open_tag = ON #支持php短标签
找到opcache.enable=0
修改为opcache.enable=1 #php支持opcode缓存
找到:;opcache.enable_cli=1 #php支持opcode缓存
修改为:opcache.enable_cli=0
在最后一行添加:zend_extension=opcache.so #开启opcode缓存功能
ctrl+o #保存
ctrl+x #退出
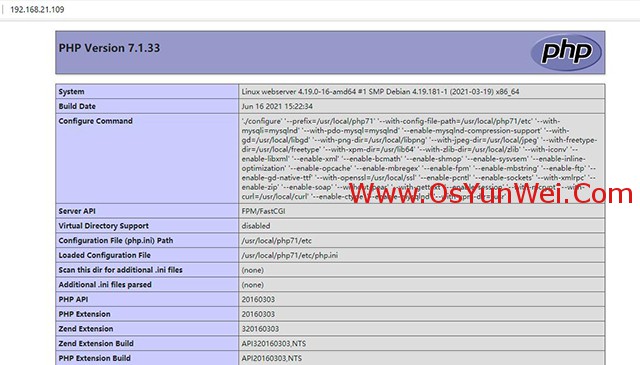
2.71、安装php7.1.x
cd /usr/local/src
tar -zvxf php-7.1.33.tar.gz
cd php-7.1.33
export LD_LIBRARY_PATH=/usr/local/libgd/lib
./configure --prefix=/usr/local/php71 --with-config-file-path=/usr/local/php71/etc --with-mysqli=mysqlnd --with-pdo-mysql=mysqlnd --enable-mysqlnd-compression-support --with-gd=/usr/local/libgd --with-png-dir=/usr/local/libpng --with-jpeg-dir=/usr/local/jpeg --with-freetype-dir=/usr/local/freetype --with-xpm-dir=/usr/lib64 --with-zlib-dir=/usr/local/zlib --with-iconv --enable-libxml --enable-xml --enable-bcmath --enable-shmop --enable-sysvsem --enable-inline-optimization --enable-opcache --enable-mbregex --enable-fpm --enable-mbstring --enable-ftp --enable-gd-native-ttf --with-openssl=/usr/local/ssl --enable-pcntl --enable-sockets --with-xmlrpc --enable-zip --enable-soap --without-pear --with-gettext --enable-session --with-mcrypt --with-curl=/usr/local/curl --enable-ctype --enable-mysqlnd --with-xpm-dir=/usr
make #编译
make install #安装
cp php.ini-production /usr/local/php71/etc/php.ini #复制php配置文件到安装目录
rm -rf /etc/php.ini #删除系统自带配置文件
ln -s /usr/local/php71/etc/php.ini /etc/php.ini #添加软链接到 /etc目录
cp /usr/local/php71/etc/php-fpm.conf.default /usr/local/php71/etc/php-fpm.conf #拷贝模板文件为php-fpm配置文件
ln -s /usr/local/php71/etc/php-fpm.conf /etc/php-fpm.conf #添加软连接到 /etc目录
nano /usr/local/php71/etc/php-fpm.conf #编辑
pid = run/php-fpm.pid #取消前面的分号
include=/usr/local/php71/etc/php-fpm.d/*.conf
:wq! #保存退出
cp /usr/local/php71/etc/php-fpm.d/www.conf.default /usr/local/php71/etc/php-fpm.d/www.conf
nano /usr/local/php71/etc/php-fpm.d/www.conf #编辑
user = www #设置php-fpm运行账号为www
group = www #设置php-fpm运行组为www
listen = 127.0.0.1:9071
ctrl+o #保存
ctrl+x #退出
设置 php-fpm开机启动
cp /usr/local/src/php-7.1.33/sapi/fpm/init.d.php-fpm /etc/rc.d/init.d/php71-fpm #拷贝php-fpm到启动目录
chmod +x /etc/rc.d/init.d/php71-fpm #添加执行权限
update-rc.d php71-fpm defaults 99 #设置开机启动
nano /etc/rc.d/init.d/php71-fpm
prefix=/usr/local/php71
php_fpm_BIN=${exec_prefix}/sbin/php71-fpm
ctrl+o #保存
ctrl+x #退出
mv /usr/local/php71/sbin/php-fpm /usr/local/php71/sbin/php71-fpm
systemctl daemon-reload #重新加载配置
service php71-fpm start #启动
nano /usr/local/php71/etc/php.ini #编辑配置文件
找到:disable_functions =
修改为:disable_functions = passthru,exec,system,chroot,scandir,chgrp,chown,shell_exec,proc_open,proc_get_status,ini_alter,ini_alter,ini_restore,dl,openlog,syslog,readlink,symlink,popepassthru,stream_socket_server,escapeshellcmd,dll,popen,disk_free_space,checkdnsrr,checkdnsrr,getservbyname,getservbyport,disk_total_space,posix_ctermid,posix_get_last_error,posix_getcwd, posix_getegid,posix_geteuid,posix_getgid, posix_getgrgid,posix_getgrnam,posix_getgroups,posix_getlogin,posix_getpgid,posix_getpgrp,posix_getpid, posix_getppid,posix_getpwnam,posix_getpwuid, posix_getrlimit, posix_getsid,posix_getuid,posix_isatty, posix_kill,posix_mkfifo,posix_setegid,posix_seteuid,posix_setgid, posix_setpgid,posix_setsid,posix_setuid,posix_strerror,posix_times,posix_ttyname,posix_uname
#列出PHP可以禁用的函数,如果某些程序需要用到这个函数,可以删除,取消禁用。
找到:;date.timezone =
修改为:date.timezone = PRC #设置时区
找到:expose_php = On
修改为:expose_php = Off #禁止显示php版本的信息
找到:short_open_tag = Off
修改为:short_open_tag = ON #支持php短标签
找到opcache.enable=0
修改为opcache.enable=1 #php支持opcode缓存
找到:;opcache.enable_cli=1 #php支持opcode缓存
修改为:opcache.enable_cli=0
在最后一行添加:zend_extension=opcache.so #开启opcode缓存功能
ctrl+o #保存
ctrl+x #退出
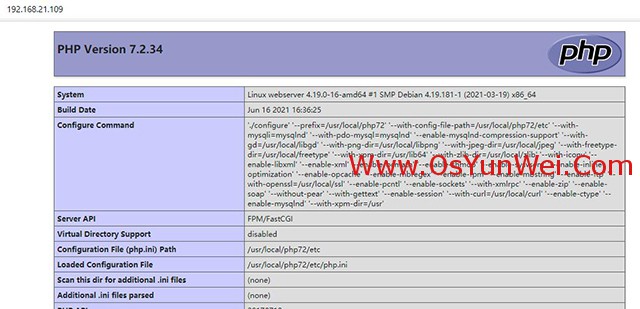
2.72、安装php7.2.x
cd /usr/local/src
tar -zvxf php-7.2.34.tar.gz
cd php-7.2.34
export LD_LIBRARY_PATH=/usr/local/libgd/lib
./configure --prefix=/usr/local/php72 --with-config-file-path=/usr/local/php72/etc --with-mysqli=mysqlnd --with-pdo-mysql=mysqlnd --enable-mysqlnd-compression-support --with-gd=/usr/local/libgd --with-png-dir=/usr/local/libpng --with-jpeg-dir=/usr/local/jpeg --with-freetype-dir=/usr/local/freetype --with-xpm-dir=/usr/lib64 --with-zlib-dir=/usr/local/zlib --with-iconv --enable-libxml --enable-xml --enable-bcmath --enable-shmop --enable-sysvsem --enable-inline-optimization --enable-opcache --enable-mbregex --enable-fpm --enable-mbstring --enable-ftp --with-openssl=/usr/local/ssl --enable-pcntl --enable-sockets --with-xmlrpc --enable-zip --enable-soap --without-pear --with-gettext --enable-session --with-curl=/usr/local/curl --enable-ctype --enable-mysqlnd --with-xpm-dir=/usr
make #编译
make install #安装
cp php.ini-production /usr/local/php72/etc/php.ini #复制php配置文件到安装目录
rm -rf /etc/php.ini #删除系统自带配置文件
ln -s /usr/local/php72/etc/php.ini /etc/php.ini #添加软链接到 /etc目录
cp /usr/local/php72/etc/php-fpm.conf.default /usr/local/php72/etc/php-fpm.conf #拷贝模板文件为php-fpm配置文件
ln -s /usr/local/php72/etc/php-fpm.conf /etc/php-fpm.conf #添加软连接到 /etc目录
nano /usr/local/php72/etc/php-fpm.conf #编辑
pid = run/php-fpm.pid #取消前面的分号
include=/usr/local/php72/etc/php-fpm.d/*.conf
ctrl+o #保存
ctrl+x #退出
cp /usr/local/php72/etc/php-fpm.d/www.conf.default /usr/local/php72/etc/php-fpm.d/www.conf
nano /usr/local/php72/etc/php-fpm.d/www.conf #编辑
user = www #设置php-fpm运行账号为www
group = www #设置php-fpm运行组为www
listen = 127.0.0.1:9072
ctrl+o #保存
ctrl+x #退出
设置 php-fpm开机启动
cp /usr/local/src/php-7.2.34/sapi/fpm/init.d.php-fpm /etc/rc.d/init.d/php72-fpm #拷贝php-fpm到启动目录
chmod +x /etc/rc.d/init.d/php72-fpm #添加执行权限
update-rc.d php72-fpm defaults 99 #设置开机启动
nano /etc/rc.d/init.d/php72-fpm
prefix=/usr/local/php72
php_fpm_BIN=${exec_prefix}/sbin/php72-fpm
ctrl+o #保存
ctrl+x #退出
mv /usr/local/php72/sbin/php-fpm /usr/local/php72/sbin/php72-fpm
systemctl daemon-reload #重新加载配置
systemctl start php72-fpm.service #启动
nano /usr/local/php72/etc/php.ini #编辑配置文件
找到:disable_functions =
修改为:disable_functions = passthru,exec,system,chroot,scandir,chgrp,chown,shell_exec,proc_open,proc_get_status,ini_alter,ini_alter,ini_restore,dl,openlog,syslog,readlink,symlink,popepassthru,stream_socket_server,escapeshellcmd,dll,popen,disk_free_space,checkdnsrr,checkdnsrr,getservbyname,getservbyport,disk_total_space,posix_ctermid,posix_get_last_error,posix_getcwd, posix_getegid,posix_geteuid,posix_getgid, posix_getgrgid,posix_getgrnam,posix_getgroups,posix_getlogin,posix_getpgid,posix_getpgrp,posix_getpid, posix_getppid,posix_getpwnam,posix_getpwuid, posix_getrlimit, posix_getsid,posix_getuid,posix_isatty, posix_kill,posix_mkfifo,posix_setegid,posix_seteuid,posix_setgid, posix_setpgid,posix_setsid,posix_setuid,posix_strerror,posix_times,posix_ttyname,posix_uname
#列出PHP可以禁用的函数,如果某些程序需要用到这个函数,可以删除,取消禁用。
找到:;date.timezone =
修改为:date.timezone = PRC #设置时区
找到:expose_php = On
修改为:expose_php = Off #禁止显示php版本的信息
找到:short_open_tag = Off
修改为:short_open_tag = ON #支持php短标签
找到opcache.enable=0
修改为opcache.enable=1 #php支持opcode缓存
找到:;opcache.enable_cli=1 #php支持opcode缓存
修改为:opcache.enable_cli=0
在最后一行添加:zend_extension=opcache.so #开启opcode缓存功能
ctrl+o #保存
ctrl+x #退出
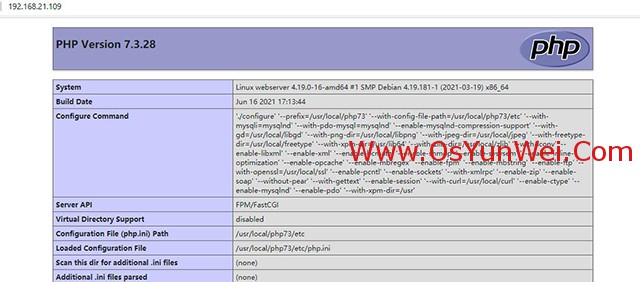
2.73、安装php7.3.x
2.73.1
cd /usr/local/src
tar -zvxf php-7.3.28.tar.gz
cd php-7.3.28
export LD_LIBRARY_PATH=/usr/local/libgd/lib
export PKG_CONFIG_PATH="/usr/local/lib/pkgconfig/" #libzip库安装位置,否则安装php可能会报错
./configure --prefix=/usr/local/php73 --with-config-file-path=/usr/local/php73/etc --with-mysqli=mysqlnd --with-pdo-mysql=mysqlnd --enable-mysqlnd-compression-support --with-gd=/usr/local/libgd --with-png-dir=/usr/local/libpng --with-jpeg-dir=/usr/local/jpeg --with-freetype-dir=/usr/local/freetype --with-xpm-dir=/usr/lib64 --with-zlib-dir=/usr/local/zlib --with-iconv --enable-libxml --enable-xml --enable-bcmath --enable-shmop --enable-sysvsem --enable-inline-optimization --enable-opcache --enable-mbregex --enable-fpm --enable-mbstring --enable-ftp --with-openssl=/usr/local/ssl --enable-pcntl --enable-sockets --with-xmlrpc --enable-zip --enable-soap --without-pear --with-gettext --enable-session --with-curl=/usr/local/curl --enable-ctype --enable-mysqlnd --enable-pdo --with-xpm-dir=/usr
make #编译
make install #安装
cp php.ini-production /usr/local/php73/etc/php.ini #复制php配置文件到安装目录
rm -rf /etc/php.ini #删除系统自带配置文件
ln -s /usr/local/php73/etc/php.ini /etc/php.ini #添加软链接到 /etc目录
cp /usr/local/php73/etc/php-fpm.conf.default /usr/local/php73/etc/php-fpm.conf #拷贝模板文件为php-fpm配置文件
ln -s /usr/local/php73/etc/php-fpm.conf /etc/php-fpm.conf #添加软连接到 /etc目录
nano /usr/local/php73/etc/php-fpm.conf #编辑
pid = run/php-fpm.pid #取消前面的分号
include=/usr/local/php73/etc/php-fpm.d/*.conf
ctrl+o #保存
ctrl+x #退出
cp /usr/local/php73/etc/php-fpm.d/www.conf.default /usr/local/php73/etc/php-fpm.d/www.conf
nano /usr/local/php73/etc/php-fpm.d/www.conf #编辑
user = www #设置php-fpm运行账号为www
group = www #设置php-fpm运行组为www
listen = 127.0.0.1:9073
ctrl+o #保存
ctrl+x #退出
1.73.2、设置 php-fpm开机启动(有两种设置方法,选择一种即可)
2.73.2.1 #chkconfig方式
cp /usr/local/src/php-7.3.28/sapi/fpm/init.d.php-fpm /etc/rc.d/init.d/php73-fpm #拷贝php-fpm到启动目录
chmod +x /etc/rc.d/init.d/php73-fpm #添加执行权限
chkconfig php73-fpm on #设置开机启动
nano /etc/rc.d/init.d/php73-fpm
prefix=/usr/local/php73
php_fpm_BIN=${exec_prefix}/sbin/php73-fpm
ctrl+o #保存
ctrl+x #退出
mv /usr/local/php73/sbin/php-fpm /usr/local/php73/sbin/php73-fpm
service php73-fpm start #启动php71-fpm
service php73-fpm stop #停止php71-fpm
2.73.2.2 #systemctl方式
nano /usr/lib/systemd/system/php73-fpm.service #编辑添加以下代码
[Unit]
Description=The PHP FastCGI Process Manager
After=syslog.target network.target
[Service]
Type=simple
PIDFile=/run/php-fpm.pid
ExecStart=/usr/local/php73/sbin/php73-fpm --nodaemonize --fpm-config /usr/local/php73/etc/php-fpm.conf
ExecReload=/bin/kill -USR2 $MAINPID
ExecStop=/bin/kill -SIGINT $MAINPID
[Install]
WantedBy=multi-user.target
ctrl+o #保存
ctrl+x #退出
mv /usr/local/php73/sbin/php-fpm /usr/local/php73/sbin/php73-fpm
systemctl enable php73-fpm.service #设置开机自启动
systemctl daemon-reload #重新加载systemctll
systemctl start php73-fpm.service #启动
systemctl stop php73-fpm.service #停止
systemctl restart php73-fpm.service #重启
2.73.3 配置php配置文件
nano /usr/local/php73/etc/php.ini #编辑配置文件
找到:disable_functions =
修改为:disable_functions = passthru,exec,system,chroot,scandir,chgrp,chown,shell_exec,proc_open,proc_get_status,ini_alter,ini_alter,ini_restore,dl,openlog,syslog,readlink,symlink,popepassthru,stream_socket_server,escapeshellcmd,dll,popen,disk_free_space,checkdnsrr,checkdnsrr,getservbyname,getservbyport,disk_total_space,posix_ctermid,posix_get_last_error,posix_getcwd, posix_getegid,posix_geteuid,posix_getgid, posix_getgrgid,posix_getgrnam,posix_getgroups,posix_getlogin,posix_getpgid,posix_getpgrp,posix_getpid, posix_getppid,posix_getpwnam,posix_getpwuid, posix_getrlimit, posix_getsid,posix_getuid,posix_isatty, posix_kill,posix_mkfifo,posix_setegid,posix_seteuid,posix_setgid, posix_setpgid,posix_setsid,posix_setuid,posix_strerror,posix_times,posix_ttyname,posix_uname
#列出PHP可以禁用的函数,如果某些程序需要用到这个函数,可以删除,取消禁用。
找到:;date.timezone =
修改为:date.timezone = PRC #设置时区
找到:expose_php = On
修改为:expose_php = Off #禁止显示php版本的信息
找到:short_open_tag = Off
修改为:short_open_tag = ON #支持php短标签
找到opcache.enable=0
修改为opcache.enable=1 #php支持opcode缓存
找到:;opcache.enable_cli=1
修改为:opcache.enable_cli=0 #php支持opcode缓存
在最后一行添加:zend_extension=opcache.so #开启opcode缓存功能
ctrl+o #保存
ctrl+x #退出
2.74、安装php7.4.x
php7.4.x中这2个库需要使用系统自带的高版本进行编译--with-openssl --with-curl
cd /usr/local/src
tar -zvxf php-7.4.20.tar.gz
cd php-7.4.20
export LD_LIBRARY_PATH=/usr/local/libgd/lib #设置libgd库环境变量
export PKG_CONFIG_PATH="/usr/local/lib/pkgconfig/" #设置libzip环境变量
./configure --prefix=/usr/local/php74 --with-config-file-path=/usr/local/php74/etc --with-mysqli=mysqlnd --with-pdo-mysql=mysqlnd --enable-gd --with-jpeg=/usr/local/jpeg --with-freetype=/usr/local/freetype --with-xpm=/usr/lib64 --with-zlib-dir=/usr/local/zlib --with-iconv --with-libxml --enable-xml --enable-bcmath --enable-shmop --enable-sysvsem --enable-inline-optimization --enable-opcache --enable-mbregex --enable-fpm --enable-mbstring --enable-ftp --with-openssl --enable-pcntl --enable-sockets --with-xmlrpc --with-zip --enable-soap --without-pear --with-gettext --enable-session --with-curl --enable-ctype --enable-mysqlnd --enable-pdo
make #编译
make install #安装
./configure --help #可以查看编译参数的写法
cp php.ini-production /usr/local/php74/etc/php.ini #复制php配置文件到安装目录
rm -rf /etc/php.ini #删除系统自带配置文件
ln -s /usr/local/php74/etc/php.ini /etc/php.ini #添加软链接到 /etc目录
cp /usr/local/php74/etc/php-fpm.conf.default /usr/local/php74/etc/php-fpm.conf #拷贝模板文件为php-fpm配置文件
ln -s /usr/local/php74/etc/php-fpm.conf /etc/php-fpm.conf #添加软连接到 /etc目录
nano /usr/local/php74/etc/php-fpm.conf #编辑
pid = run/php-fpm.pid #取消前面的分号
include=/usr/local/php74/etc/php-fpm.d/*.conf
ctrl+o #保存
ctrl+x #退出
cp /usr/local/php74/etc/php-fpm.d/www.conf.default /usr/local/php74/etc/php-fpm.d/www.conf
nano /usr/local/php74/etc/php-fpm.d/www.conf #编辑
user = www #设置php-fpm运行账号为www
group = www #设置php-fpm运行组为www
listen = 127.0.0.1:9074
ctrl+o #保存
ctrl+x #退出
#设置 php-fpm开机启动
nano /usr/lib/systemd/system/php74-fpm.service #编辑添加以下代码
[Unit]
Description=The PHP FastCGI Process Manager
After=syslog.target network.target
[Service]
Type=simple
PIDFile=/run/php-fpm.pid
ExecStart=/usr/local/php74/sbin/php74-fpm --nodaemonize --fpm-config /usr/local/php74/etc/php-fpm.conf
ExecReload=/bin/kill -USR2 $MAINPID
ExecStop=/bin/kill -SIGINT $MAINPID
[Install]
WantedBy=multi-user.target
ctrl+o #保存
ctrl+x #退出
mv /usr/local/php74/sbin/php-fpm /usr/local/php74/sbin/php74-fpm
systemctl enable php74-fpm.service #设置开机自启动
systemctl daemon-reload #重新加载systemctll
systemctl start php74-fpm.service #启动
systemctl stop php74-fpm.service #停止
systemctl restart php74-fpm.service #重启
nano /usr/local/php74/etc/php.ini #编辑配置文件
找到:disable_functions =
修改为:disable_functions = passthru,exec,system,chroot,scandir,chgrp,chown,shell_exec,proc_open,proc_get_status,ini_alter,ini_alter,ini_restore,dl,openlog,syslog,readlink,symlink,popepassthru,stream_socket_server,escapeshellcmd,dll,popen,disk_free_space,checkdnsrr,checkdnsrr,getservbyname,getservbyport,disk_total_space,posix_ctermid,posix_get_last_error,posix_getcwd, posix_getegid,posix_geteuid,posix_getgid, posix_getgrgid,posix_getgrnam,posix_getgroups,posix_getlogin,posix_getpgid,posix_getpgrp,posix_getpid, posix_getppid,posix_getpwnam,posix_getpwuid, posix_getrlimit, posix_getsid,posix_getuid,posix_isatty, posix_kill,posix_mkfifo,posix_setegid,posix_seteuid,posix_setgid, posix_setpgid,posix_setsid,posix_setuid,posix_strerror,posix_times,posix_ttyname,posix_uname
#列出PHP可以禁用的函数,如果某些程序需要用到这个函数,可以删除,取消禁用。
找到:;date.timezone =
修改为:date.timezone = PRC #设置时区
找到:expose_php = On
修改为:expose_php = Off #禁止显示php版本的信息
找到:short_open_tag = Off
修改为:short_open_tag = ON #支持php短标签
找到opcache.enable=0
修改为opcache.enable=1 #php支持opcode缓存
找到:;opcache.enable_cli=1
修改为:opcache.enable_cli=0 #php支持opcode缓存
在最后一行添加:zend_extension=opcache.so #开启opcode缓存功能
ctrl+o #保存
ctrl+x #退出
2.80、安装php8.0.x
#php8.0.x中这2个库需要使用系统自带的高版本进行编译--with-openssl --with-curl
cd /usr/local/src
tar -zvxf php-8.0.7.tar.gz
cd php-8.0.7
export LD_LIBRARY_PATH=/usr/local/libgd/lib #设置libgd库环境变量
./configure --prefix=/usr/local/php80 --with-config-file-path=/usr/local/php80/etc --with-mysqli=mysqlnd --with-pdo-mysql=mysqlnd --enable-gd --with-jpeg=/usr/local/jpeg --with-freetype=/usr/local/freetype --with-xpm=/usr/lib64 --with-zlib-dir=/usr/local/zlib --with-iconv --with-libxml --enable-xml --enable-bcmath --enable-shmop --enable-sysvsem --enable-opcache --enable-mbregex --enable-fpm --enable-mbstring --enable-ftp --with-openssl --enable-pcntl --enable-sockets --with-zip --enable-soap --without-pear --with-gettext --enable-session --with-curl --enable-ctype --enable-mysqlnd --enable-pdo
make #编译
make install #安装
./configure --help #可以查看编译参数的写法
cp php.ini-production /usr/local/php80/etc/php.ini #复制php配置文件到安装目录
#rm -rf /etc/php.ini #删除系统自带配置文件
#ln -s /usr/local/php80/etc/php.ini /etc/php.ini #添加软链接到 /etc目录
cp /usr/local/php80/etc/php-fpm.conf.default /usr/local/php80/etc/php-fpm.conf #拷贝模板文件为php-fpm配置文件
ln -s /usr/local/php80/etc/php-fpm.conf /etc/php-fpm.conf #添加软连接到 /etc目录
nano /usr/local/php80/etc/php-fpm.conf #编辑
pid = run/php-fpm.pid #取消前面的分号
include=/usr/local/php80/etc/php-fpm.d/*.conf
:wq! #保存退出
cp /usr/local/php80/etc/php-fpm.d/www.conf.default /usr/local/php80/etc/php-fpm.d/www.conf
nano /usr/local/php80/etc/php-fpm.d/www.conf #编辑
user = www #设置php-fpm运行账号为www
group = www #设置php-fpm运行组为www
listen = 127.0.0.1:9080
ctrl+o #保存
ctrl+x #退出
#设置 php-fpm开机启动
nano /usr/lib/systemd/system/php80-fpm.service #编辑添加以下代码
[Unit]
Description=The PHP FastCGI Process Manager
After=syslog.target network.target
[Service]
Type=simple
PIDFile=/run/php-fpm.pid
ExecStart=/usr/local/php80/sbin/php80-fpm --nodaemonize --fpm-config /usr/local/php80/etc/php-fpm.conf
ExecReload=/bin/kill -USR2 $MAINPID
ExecStop=/bin/kill -SIGINT $MAINPID
[Install]
WantedBy=multi-user.target
ctrl+o #保存
ctrl+x #退出
mv /usr/local/php80/sbin/php-fpm /usr/local/php80/sbin/php80-fpm
systemctl enable php80-fpm.service #设置开机自启动
systemctl daemon-reload #重新加载systemctll
systemctl start php80-fpm.service #启动
systemctl stop php80-fpm.service #停止
systemctl restart php80-fpm.service #重启
nano /usr/local/php80/etc/php.ini #编辑配置文件
找到:disable_functions =
修改为:disable_functions = passthru,exec,system,chroot,scandir,chgrp,chown,shell_exec,proc_open,proc_get_status,ini_alter,ini_alter,ini_restore,dl,openlog,syslog,readlink,symlink,popepassthru,stream_socket_server,escapeshellcmd,dll,popen,disk_free_space,checkdnsrr,checkdnsrr,getservbyname,getservbyport,disk_total_space,posix_ctermid,posix_get_last_error,posix_getcwd, posix_getegid,posix_geteuid,posix_getgid, posix_getgrgid,posix_getgrnam,posix_getgroups,posix_getlogin,posix_getpgid,posix_getpgrp,posix_getpid, posix_getppid,posix_getpwnam,posix_getpwuid, posix_getrlimit, posix_getsid,posix_getuid,posix_isatty, posix_kill,posix_mkfifo,posix_setegid,posix_seteuid,posix_setgid, posix_setpgid,posix_setsid,posix_setuid,posix_strerror,posix_times,posix_ttyname,posix_uname
#列出PHP可以禁用的函数,如果某些程序需要用到这个函数,可以删除,取消禁用。
找到:;date.timezone =
修改为:date.timezone = PRC #设置时区
找到:expose_php = On
修改为:expose_php = Off #禁止显示php版本的信息
找到:short_open_tag = Off
修改为:short_open_tag = ON #支持php短标签
找到opcache.enable=0
修改为opcache.enable=1 #php支持opcode缓存
找到:;opcache.enable_cli=1
修改为:opcache.enable_cli=0 #php支持opcode缓存
在最后一行添加:zend_extension=opcache.so #开启opcode缓存功能
[JIT] #在最后添加JIT配置参数
opcache.jit=1205
opcache.jit_buffer_size=64M
ctrl+o #保存
ctrl+x #退出
四、配置nginx支持php
nano /usr/local/nginx/conf/nginx.conf
#修改/usr/local/nginx/conf/nginx.conf 配置文件,需做如下修改
user www www; #首行user去掉注释,修改Nginx运行组为www www;必须与/usr/local/php/etc/php-fpm.conf中的user,group配置相同,否则php运行出错
index index.html index.htm index.php; #添加index.php
# pass the PHP scripts to FastCGI server listening on 127.0.0.1:9000
#
location ~ \.php$ {
root html;
fastcgi_pass 127.0.0.1:9080;
fastcgi_index index.php;
fastcgi_param SCRIPT_FILENAME $document_root$fastcgi_script_name;
include fastcgi_params;
}
ctrl+o #保存
ctrl+x #退出
#取消FastCGI server部分location的注释,注意fastcgi_param行的参数,改为$document_root$fastcgi_script_name,或者使用绝对路径
systemctl restart nginx.service #重启nginx
service php80-fpm restart #启动php80-fpm
说明:
fastcgi_pass 127.0.0.1:9000;中使用端口号来区分php版本,需要使用哪个php版本就修改为相应的端口。
9080对应的php版本是php8.0.x
9074对应的php版本是php7.4.x
9073对应的php版本是php7.3.x
9072对应的php版本是php7.2.x
9071对应的php版本是php7.1.x
9070对应的php版本是php7.0.x
9056对应的php版本是php5.6.x
9055对应的php版本是php5.5.x
9054对应的php版本是php5.4.x
9053对应的php版本是php5.3.x
9052对应的php版本是php5.2.x
五、多版本php共存总结
1、规划php安装路径
/usr/local/php52
/usr/local/php53
/usr/local/php54
/usr/local/php55
/usr/local/php56
/usr/local/php70
/usr/local/php71
/usr/local/php72
/usr/local/php73
/usr/local/php74
/usr/local/php80
2、编译php参数
./configure --prefix=/usr/local/php52 --with-config-file-path=/usr/local/php52/etc --with-mysql=/usr/local/mysql57 --with-mysqli=/usr/local/mysql57/bin/mysql_config --with-mysql-sock=/tmp/mysql.sock --with-pdo-mysql=/usr/local/mysql57 --with-gd=/usr/local/gd --with-freetype-dir=/usr/local/freetype --with-jpeg-dir=/usr/local/jpeg --with-png-dir=/usr/local/libpng --with-iconv --with-zlib --enable-xml --enable-discard-path --enable-magic-quotes --enable-safe-mode --enable-bcmath --enable-shmop --enable-sysvsem --enable-inline-optimization --with-curlwrappers --enable-mbregex --enable-fastcgi --enable-fpm --enable-force-cgi-redirect --enable-mbstring --enable-ftp --enable-gd-native-ttf --with-openssl=/usr/local/ssl --enable-pcntl --enable-sockets --with-xmlrpc --enable-zip --enable-soap --without-pear --with-gettext --with-mime-magic --enable-session --with-mcrypt --with-curl=/usr/local/curl --enable-ctype --with-mysqli=shared
./configure --prefix=/usr/local/php53 --with-config-file-path=/usr/local/php53/etc --with-pdo-mysql=mysqlnd --enable-mysqlnd-compression-support --with-gd=/usr/local/gd --with-png-dir=/usr/lib --with-jpeg-dir=/usr/lib --with-freetype-dir=/usr/local/freetype --with-iconv --with-zlib-dir=/usr/local/zlib --enable-xml --enable-magic-quotes --enable-safe-mode --enable-bcmath --enable-shmop --enable-sysvsem --enable-inline-optimization --with-curlwrappers --enable-mbregex --enable-fpm --enable-mbstring --enable-ftp --enable-gd-native-ttf --with-openssl=/usr/local/ssl --enable-pcntl --enable-sockets --with-xmlrpc --enable-zip --enable-soap --without-pear --with-gettext --enable-session --with-mcrypt --with-curl=/usr/local/curl --enable-ctype --enable-mysqlnd --with-xpm-dir=/usr
./configure --prefix=/usr/local/php54 --with-config-file-path=/usr/local/php54/etc --with-mysqli=mysqlnd --with-pdo-mysql=mysqlnd --enable-mysqlnd-compression-support --with-gd=/usr/local/gd --with-png-dir=/usr/local/libpng --with-jpeg-dir=/usr/local/jpeg --with-freetype-dir=/usr/local/freetype --with-xpm-dir=/usr/lib64 --with-vpx-dir=/usr/local/libvpx/ --with-zlib-dir=/usr/local/zlib --with-t1lib=/usr/local/t1lib --with-iconv --enable-libxml --enable-xml --enable-bcmath --enable-shmop --enable-sysvsem --enable-inline-optimization --enable-mbregex --enable-fpm --enable-mbstring --enable-ftp --enable-gd-native-ttf --with-openssl=/usr/local/ssl --enable-pcntl --enable-sockets --with-xmlrpc --enable-zip --enable-soap --without-pear --with-gettext --enable-session --with-mcrypt --with-curl=/usr/local/curl --enable-ctype --enable-mysqlnd --with-xpm-dir=/usr
./configure --prefix=/usr/local/php55 --with-config-file-path=/usr/local/php55/etc --with-mysqli=mysqlnd --with-pdo-mysql=mysqlnd --enable-mysqlnd-compression-support --with-gd=/usr/local/libgd --with-png-dir=/usr/local/libpng --with-jpeg-dir=/usr/local/jpeg --with-freetype-dir=/usr/local/freetype --with-xpm-dir=/usr/lib64 --with-vpx-dir=/usr/local/libvpx/ --with-zlib-dir=/usr/local/zlib --with-t1lib=/usr/local/t1lib --with-iconv --enable-libxml --enable-xml --enable-bcmath --enable-shmop --enable-sysvsem --enable-inline-optimization --enable-opcache --enable-mbregex --enable-fpm --enable-mbstring --enable-ftp --enable-gd-native-ttf --with-openssl=/usr/local/ssl --enable-pcntl --enable-sockets --with-xmlrpc --enable-zip --enable-soap --without-pear --with-gettext --enable-session --with-mcrypt --with-curl=/usr/local/curl --enable-ctype --enable-mysqlnd --with-xpm-dir=/usr
./configure --prefix=/usr/local/php56 --with-config-file-path=/usr/local/php56/etc --with-mysqli=mysqlnd --with-pdo-mysql=mysqlnd --enable-mysqlnd-compression-support --with-gd=/usr/local/libgd --with-png-dir=/usr/local/libpng --with-jpeg-dir=/usr/local/jpeg --with-freetype-dir=/usr/local/freetype --with-xpm-dir=/usr/lib64 --with-vpx-dir=/usr/local/libvpx/ --with-zlib-dir=/usr/local/zlib --with-t1lib=/usr/local/t1lib --with-iconv --enable-libxml --enable-xml --enable-bcmath --enable-shmop --enable-sysvsem --enable-inline-optimization --enable-opcache --enable-mbregex --enable-fpm --enable-mbstring --enable-ftp --enable-gd-native-ttf --with-openssl=/usr/local/ssl --enable-pcntl --enable-sockets --with-xmlrpc --enable-zip --enable-soap --without-pear --with-gettext --enable-session --with-mcrypt --with-curl=/usr/local/curl --enable-ctype --enable-mysqlnd --with-xpm-dir=/usr
./configure --prefix=/usr/local/php70 --with-config-file-path=/usr/local/php70/etc --with-mysqli=mysqlnd --with-pdo-mysql=mysqlnd --enable-mysqlnd-compression-support --with-gd=/usr/local/libgd --with-png-dir=/usr/local/libpng --with-jpeg-dir=/usr/local/jpeg --with-freetype-dir=/usr/local/freetype --with-xpm-dir=/usr/lib64 --with-zlib-dir=/usr/local/zlib --with-iconv --enable-libxml --enable-xml --enable-bcmath --enable-shmop --enable-sysvsem --enable-inline-optimization --enable-opcache --enable-mbregex --enable-fpm --enable-mbstring --enable-ftp --enable-gd-native-ttf --with-openssl=/usr/local/ssl --enable-pcntl --enable-sockets --with-xmlrpc --enable-zip --enable-soap --without-pear --with-gettext --enable-session --with-mcrypt --with-curl=/usr/local/curl --enable-ctype --enable-mysqlnd --with-xpm-dir=/usr
./configure --prefix=/usr/local/php71 --with-config-file-path=/usr/local/php71/etc --with-mysqli=mysqlnd --with-pdo-mysql=mysqlnd --enable-mysqlnd-compression-support --with-gd=/usr/local/libgd --with-png-dir=/usr/local/libpng --with-jpeg-dir=/usr/local/jpeg --with-freetype-dir=/usr/local/freetype --with-xpm-dir=/usr/lib64 --with-zlib-dir=/usr/local/zlib --with-iconv --enable-libxml --enable-xml --enable-bcmath --enable-shmop --enable-sysvsem --enable-inline-optimization --enable-opcache --enable-mbregex --enable-fpm --enable-mbstring --enable-ftp --enable-gd-native-ttf --with-openssl=/usr/local/ssl --enable-pcntl --enable-sockets --with-xmlrpc --enable-zip --enable-soap --without-pear --with-gettext --enable-session --with-mcrypt --with-curl=/usr/local/curl --enable-ctype --enable-mysqlnd --with-xpm-dir=/usr
./configure --prefix=/usr/local/php72 --with-config-file-path=/usr/local/php72/etc --with-mysqli=mysqlnd --with-pdo-mysql=mysqlnd --enable-mysqlnd-compression-support --with-gd=/usr/local/libgd --with-png-dir=/usr/local/libpng --with-jpeg-dir=/usr/local/jpeg --with-freetype-dir=/usr/local/freetype --with-xpm-dir=/usr/lib64 --with-zlib-dir=/usr/local/zlib --with-iconv --enable-libxml --enable-xml --enable-bcmath --enable-shmop --enable-sysvsem --enable-inline-optimization --enable-opcache --enable-mbregex --enable-fpm --enable-mbstring --enable-ftp --with-openssl=/usr/local/ssl --enable-pcntl --enable-sockets --with-xmlrpc --enable-zip --enable-soap --without-pear --with-gettext --enable-session --with-curl=/usr/local/curl --enable-ctype --enable-mysqlnd --with-xpm-dir=/usr
./configure --prefix=/usr/local/php73 --with-config-file-path=/usr/local/php73/etc --with-mysqli=mysqlnd --with-pdo-mysql=mysqlnd --enable-mysqlnd-compression-support --with-gd=/usr/local/libgd --with-png-dir=/usr/local/libpng --with-jpeg-dir=/usr/local/jpeg --with-freetype-dir=/usr/local/freetype --with-xpm-dir=/usr/lib64 --with-zlib-dir=/usr/local/zlib --with-iconv --enable-libxml --enable-xml --enable-bcmath --enable-shmop --enable-sysvsem --enable-inline-optimization --enable-opcache --enable-mbregex --enable-fpm --enable-mbstring --enable-ftp --with-openssl=/usr/local/ssl --enable-pcntl --enable-sockets --with-xmlrpc --enable-zip --enable-soap --without-pear --with-gettext --enable-session --with-curl=/usr/local/curl --enable-ctype --enable-mysqlnd --enable-pdo --with-xpm-dir=/usr
./configure --prefix=/usr/local/php74 --with-config-file-path=/usr/local/php74/etc --with-mysqli=mysqlnd --with-pdo-mysql=mysqlnd --enable-gd --with-jpeg=/usr/local/jpeg --with-freetype=/usr/local/freetype --with-xpm=/usr/lib64 --with-zlib-dir=/usr/local/zlib --with-iconv --with-libxml --enable-xml --enable-bcmath --enable-shmop --enable-sysvsem --enable-inline-optimization --enable-opcache --enable-mbregex --enable-fpm --enable-mbstring --enable-ftp --with-openssl --enable-pcntl --enable-sockets --with-xmlrpc --with-zip --enable-soap --without-pear --with-gettext --enable-session --with-curl --enable-ctype --enable-mysqlnd --enable-pdo
./configure --prefix=/usr/local/php80 --with-config-file-path=/usr/local/php80/etc --with-mysqli=mysqlnd --with-pdo-mysql=mysqlnd --enable-gd --with-jpeg=/usr/local/jpeg --with-freetype=/usr/local/freetype --with-xpm=/usr/lib64 --with-zlib-dir=/usr/local/zlib --with-iconv --with-libxml --enable-xml --enable-bcmath --enable-shmop --enable-sysvsem --enable-opcache --enable-mbregex --enable-fpm --enable-mbstring --enable-ftp --with-openssl --enable-pcntl --enable-sockets --with-zip --enable-soap --without-pear --with-gettext --enable-session --with-curl --enable-ctype --enable-mysqlnd --enable-pdo
3、php开机启动设置
cp /usr/local/src/php-8.0.7/sapi/fpm/init.d.php-fpm /etc/rc.d/init.d/php80-fpm
nano /etc/rc.d/init.d/php80-fpm
prefix=/usr/local/php80
php_fpm_BIN=${exec_prefix}/sbin/php80-fpm
ctrl+o #保存
ctrl+x #退出
mv /usr/local/php80/sbin/php-fpm /usr/local/php80/sbin/php80-fpm
4、php监听端口设置
nano /usr/local/php80/etc/php-fpm.d/www.conf #编辑
user = www
group = www
listen = 127.0.0.1:9080
ctrl+o #保存
ctrl+x #退出
5、nginx结合php
修改nginx站点配置文件
/usr/local/nginx/conf/nginx.conf
fastcgi_pass 127.0.0.1:9080;
根据之前php的设置,选择相应的端口,例如9080对应的php版本是php8.0.x
那么此站点的php版本就为php8.0.x
fastcgi_pass 127.0.0.1:9074;
根据之前php的设置,选择相应的端口,例如9074对应的php版本是php7.4.x
那么此站点的php版本就为php7.4.x
测试篇
cd /usr/local/nginx/html/ #进入nginx默认网站根目录
rm -rf /usr/local/nginx/html/* #删除默认测试页
nano index.php #新建index.php文件
<?php
phpinfo();
?>
ctrl+o #保存
ctrl+x #退出
chown www.www /usr/local/nginx/html/ -R #设置目录所有者
chmod 700 /usr/local/nginx/html/ -R #设置目录权限
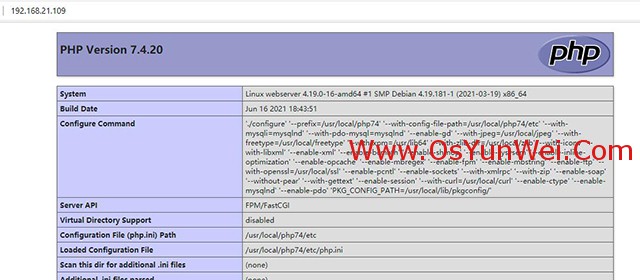
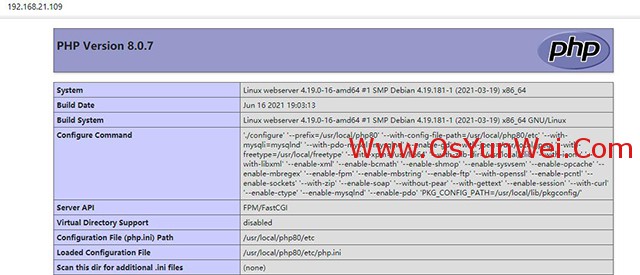
在浏览器中打开服务器IP地址,会看到下面的界面

总结:
PHP7.0.x及其以上版本目前兼容的openssl最高版本为openssl-1.1.1x
PHP5.6.x及其以下版本兼容的openssl最高版本为openssl-1.0.2x
如果php多版本共存,目前openssl-1.0.2x可以适用于php5.2到php8.0所有版本。
Debian 10.9.x + MySQL8.0.x + php 8.0/7.4/7.3/7.2/7.1/7.0组合建议使用系统自带的openssl-1.1.1x版本
Debian 10.9.x + MySQL8.0.x + php 5.6/5.5/5.4/5.3/5.2组合建议使用系统openssl-1.0.2x进行编译
Debian 10.9.x + MySQL8.0.x + php 5.4/5.3/5.2组合建议使用gd-2.0.35进行编译,php5.4存在void (*data);的bug,需要修改gd文件。
Debian 10.9.x + MySQL8.0.x + php 5.2此组合编译安装php需要用到MySQL5.7的驱动文件,MySQL8.0.x默认没有php5.2驱动。
推荐:Debian 10.9.x + MySQL8.0.x使用php 8.0/7.4/7.3/7.2/7.1/7.0组合最佳。
php各个小版本的安装过程相同,如php 8.0.6和php 8.0.7安装过程一样。
Debian 10.9.x编译安装Nginx1.20.x+MySQL8.0.x+PHP8.0.x 7.4.x 7.3.x 7.2.x 7.1.x 7.0.x 5.6.x 5.5.x 5.4.x 5.3.x 5.2.x多版本全能环境教程完成。

 ②190706903 ③203744115