说明:
Pure-FTPd是一款开源的FTP服务器软件,配置简单,安全高效,下面我们在CentOS 8.x/Rocky Linux 8.x系统下部署Pure-FTPd
一、配置防火墙,开启Pure-FTPd需要的端口
1.1安装iptables防火墙
Ubuntu Server默认没有开启任何防火墙的,但是默认安装了ufw防火墙,我们这里推荐使用iptables防火墙。
ufw status #查看系统自带的ufw防火墙状态
Status: inactive #表示关闭
ufw disable #关闭ufw防火墙,参数enable是开启,我们这里关闭
apt-get remove ufw #卸载ufw
apt-get purge ufw #清除ufw依赖包
whereis iptables #查看系统是否安装防火墙
apt-get install iptables #运行此命令安装防火墙
mkdir /etc/sysconfig #创建防火墙配置文件存放目录
touch /etc/sysconfig/iptables #创建防火墙配置文件
nano /etc/sysconfig/iptables #编辑添加防火墙规则
# sample configuration for iptables service
# you can edit this manually or use system-config-firewall
# please do not ask us to add additional ports/services to this default configuration
*filter
:INPUT ACCEPT [0:0]
:FORWARD ACCEPT [0:0]
:OUTPUT ACCEPT [0:0]
-A INPUT -m state --state RELATED,ESTABLISHED -j ACCEPT
-A INPUT -p icmp -j ACCEPT
-A INPUT -i lo -j ACCEPT
-A INPUT -p tcp -m state --state NEW -m tcp --dport 22 -j ACCEPT
-A INPUT -p tcp -m state --state NEW -m tcp --dport 21 -j ACCEPT
-A INPUT -p tcp -m state --state NEW -m tcp --dport 30000:50000 -j ACCEPT
-A INPUT -j REJECT --reject-with icmp-host-prohibited
-A FORWARD -j REJECT --reject-with icmp-host-prohibited
COMMIT
ctrl+o #保存
ctrl+x #退出
/sbin/iptables-restore < /etc/sysconfig/iptables #使防火墙规则生效
说明:21端口是ftp服务端口;30000到50000是ftp被动模式需要的端口,可自定义一段大于1024的tcp端口。
特别注意:
1、修改完防火墙规则文件/etc/sysconfig/iptables后,需要再次执行
/sbin/iptables-restore < /etc/sysconfig/iptables 命令,防火墙规则才能生效。
2、系统重启后,防火墙默认不会开机启动,需要再次执行/sbin/iptables-restore < /etc/sysconfig/iptables命令,防火墙规则才能生效。
3、如果要临时关闭防火墙,需要清空/etc/sysconfig/iptables配置文件,再次执行/sbin/iptables-restore < /etc/sysconfig/iptables命令。
4、如果要再次开启防火墙,需要恢复/etc/sysconfig/iptables配置文件,再次执行/sbin/iptables-restore < /etc/sysconfig/iptables命令。
1.2添加防火墙管理脚本
nano /etc/init.d/iptables #编辑添加脚本
#脚本中的IPTABLES_CONFIG=/etc/sysconfig/iptables是防火墙配置规则文件的路径。
#!/bin/sh -e
### BEGIN INIT INFO
# Provides: iptables
# Required-Start: mountvirtfs ifupdown $local_fs
# Default-Start: S
# Default-Stop: 0 6
### END INIT INFO
# July 9, 2007
# James B. Crocker <ubuntu@james.crocker.name>
# Creative Commons Attribution - Share Alike 3.0 License (BY,SA)
# Script to load/unload/save iptables firewall settings.
PATH="/usr/local/sbin:/usr/local/bin:/sbin:/bin:/usr/sbin:/usr/bin"
IPTABLES=/sbin/iptables
IPTABLES_SAVE=/sbin/iptables-save
IPTABLES_RESTORE=/sbin/iptables-restore
IPTABLES_CONFIG=/etc/sysconfig/iptables
[ -x $IPTABLES ] || exit 0
. /lib/lsb/init-functions
case "$1" in
start)
log_action_begin_msg "Starting firewall"
type usplash_write >/dev/null 2>/dev/null && usplash_write "TIMEOUT 120" || true
if $IPTABLES_RESTORE < $IPTABLES_CONFIG ; then
log_action_end_msg $?
else
log_action_end_msg $?
fi
type usplash_write >/dev/null 2>/dev/null && usplash_write "TIMEOUT 15" || true
;;
stop)
log_action_begin_msg "Saving current firewall configuration"
if $IPTABLES_SAVE > $IPTABLES_CONFIG ; then
log_action_end_msg $?
else
log_action_end_msg $?
fi
log_action_begin_msg "Flushing ALL firewall rules from chains!"
if $IPTABLES -F ; then
log_action_end_msg $?
else
log_action_end_msg $?
fi
log_action_begin_msg "Deleting ALL firewall chains [Warning: ACCEPTING ALL PORT SERVICES!]"
if $IPTABLES -X ; then
$IPTABLES -P INPUT ACCEPT
$IPTABLES -P FORWARD ACCEPT
$IPTABLES -P OUTPUT ACCEPT
log_action_end_msg $?
else
log_action_end_msg $?
fi
;;
save)
log_action_begin_msg "Saving current firewall configuration"
if $IPTABLES_SAVE > $IPTABLES_CONFIG ; then
log_action_end_msg $?
else
log_action_end_msg $?
fi
;;
force-reload|restart)
log_action_begin_msg "Reloading firewall configuration [Warning: POTENTIAL NETWORK INSECURITY DURING RELOAD]"
$IPTABLES -F
$IPTABLES -X
if $IPTABLES_RESTORE < $IPTABLES_CONFIG ; then
log_action_end_msg $?
else
log_action_end_msg $?
fi
;;
*)
echo "Usage: /etc/init.d/iptables {start|stop|save|restart|force-reload}"
exit 1
;;
esac
exit 0
ctrl+o #保存
ctrl+x #退出
chmod +x /etc/init.d/iptables #添加执行权限
update-rc.d iptables defaults 99 #添加服务
systemctl start iptables.service #启动
service iptables stop #停止
#现在就可以使用上面的命令管理防火墙了,启动、停止
#如果修改了防火墙配置规则,还是需要执行/sbin/iptables-restore < /etc/sysconfig/iptables命令使其生效,然后再使用防火墙管理脚本进行管理
1.3设置防火墙开机启动
1.3.1使用系统启动脚本进行设置
cp /lib/systemd/system/rc-local.service /lib/systemd/system/rc-local.service-bak #备份
ln -s /lib/systemd/system/rc-local.service /etc/systemd/system/ #创建软连接文件
nano /lib/systemd/system/rc-local.service #添加[Install]段到最后
# SPDX-License-Identifier: LGPL-2.1+
#
# This file is part of systemd.
#
# systemd is free software; you can redistribute it and/or modify it
# under the terms of the GNU Lesser General Public License as published by
# the Free Software Foundation; either version 2.1 of the License, or
# (at your option) any later version.
# This unit gets pulled automatically into multi-user.target by
# systemd-rc-local-generator if /etc/rc.local is executable.
[Unit]
Description=/etc/rc.local Compatibility
Documentation=man:systemd-rc-local-generator(8)
ConditionFileIsExecutable=/etc/rc.local
After=network.target
[Service]
Type=forking
ExecStart=/etc/rc.local start
TimeoutSec=0
RemainAfterExit=yes
GuessMainPID=no
[Install]
WantedBy=multi-user.target
Alias=rc-local.service
ctrl+o #保存
ctrl+x #退出
nano /etc/rc.local #创建文件,添加防火墙启动命令
#!/bin/bash
/sbin/iptables-restore < /etc/sysconfig/iptables
ctrl+o #保存
ctrl+x #退出
chmod +x /etc/rc.local #添加执行权限
#重新启动系统进行测试,现在防火墙已经开机自启动了
1.3.2使用sysv-rc-conf服务设置开机启动
Ubuntu Server 20.x系统中默认已经没有sysv-rc-conf包了,我们无法直接使用apt-get安装
现在我们修改apt-get源
cp /etc/apt/sources.list /etc/apt/sources.list-bak #备份
nano /etc/apt/sources.list #编辑添加下面一行代码
deb http://archive.ubuntu.com/ubuntu/ trusty main universe restricted multiverse
ctrl+o #保存
ctrl+x #退出
apt-get update #更新软件源索引
apt-get install sysv-rc-conf #安装
#我们使用Ubuntu Server 14.x 的apt-get源来安装sysv-rc-conf,trusty表示Ubuntu Server 14.x版本
cp /usr/sbin/sysv-rc-conf /usr/sbin/chkconfig #拷贝
sysv-rc-conf iptables on #设置开机启动
chkconfig iptables on
sysv-rc-conf #查看启动服务
#重新启动系统进行测试,现在防火墙已经开机自启动了
Ubuntu系统中默认是没有开启SELINUX的,无需关闭。
三、安装pure-ftpd
1、安装编译工具包
apt-get install build-essential gcc g++ make openssl libssl-dev bzip2 wget tar
2、下载pure-ftpd
cd /usr/local/src/
wget https://download.pureftpd.org/pub/pure-ftpd/releases/pure-ftpd-1.0.49.tar.gz
3、安装pure-ftpd
mkdir -p /usr/local/pureftpd #创建安装目录
cd /usr/local/src/
tar zxvf pure-ftpd-1.0.49.tar.gz
cd pure-ftpd-1.0.49
./configure --prefix=/usr/local/pureftpd --with-language=simplified-chinese --with-everything CFLAGS=-O2 --with-puredb --with-quotas --with-cookie --with-virtualhosts --with-diraliases --with-sysquotas --with-ratios --with-altlog --with-paranoidmsg --with-shadow --with-welcomemsg --with-throttling --with-uploadscript --with-language=english --with-ftpwho --with-tls
make
make install
nano /etc/profile #把pure-ftpd服务加入系统环境变量:在最后添加下面这一行
export PATH=$PATH:/usr/local/pureftpd/bin
ctrl+o #保存
ctrl+x #退出
source /etc/profile #使配置立刻生效
nano /usr/lib/systemd/system/pure-ftpd.service #设置pureftpd开机启动
[Unit]
Description=Pure-FTPd FTP server
After=syslog.target network.target
[Service]
Type=forking
ExecStart=/usr/local/pureftpd/sbin/pure-ftpd /usr/local/pureftpd/etc/pure-ftpd.conf
ExecReload=/bin/kill -s HUP $MAINPID
ExecStop=/bin/kill -s QUIT $MAINPID
[Install]
WantedBy=multi-user.target
ctrl+o #保存
ctrl+x #退出
systemctl enable pure-ftpd #添加开机启动
systemctl start pure-ftpd.service #启动
systemctl stop pure-ftpd.service #停止
systemctl restart pure-ftpd.service #重启
4、配置pure-ftpd
4.1新建系统用户和组www,用户登录终端设为/sbin/nologin(即不能登录系统)
groupadd www
useradd -s /sbin/nologin -g www www
#此系统用户作为ftp虚拟用户的宿主用户
4.2创建FTP服务器虚拟用户访问目录
mkdir -p /data/web #ftp虚拟用户主目录
mkdir -p /data/web/ftpuser01 #ftp虚拟用户ftpuser01的目录
mkdir -p /data/web/ftpuser02 #ftp虚拟用户ftpuser02的目录
chown www.www /data/web -R #设置ftp虚拟用户目录权限为宿主用户www所有
4.3创建虚拟用户
/usr/local/pureftpd/bin/pure-pw useradd ftpuser01 -u www -d /data/web/ftpuser01
提示输入ftp虚拟用户密码:
Password:123456
Enter it again:123456
同样可以添加第二个用户
/usr/local/pureftpd/bin/pure-pw useradd ftpuser02 -u www -d /data/web/ftpuser02
-u选项将ftp虚拟用户和宿主用户www关联,虚拟用户登录后,会以宿主用户权限进行上传下载操作
-d选项后面是ftp虚拟用户的目录,每个ftp虚拟用户只能访问自己的目录
/usr/local/pureftpd/bin/pure-pw mkdb #生成虚拟用户数据文件
#虚拟用户数据存放文件
/usr/local/pureftpd/etc/pureftpd.passwd #虚拟用户文件
/usr/local/pureftpd/etc/pureftpd.pdb #虚拟用户数据文件
4.4修改pure-ftpd配置文件
mkdir -p /usr/local/pureftpd/var/run/ #创建进程文件存放目录
mkdir -p /usr/local/pureftpd/var/log/ #创建日志文件存放目录
nano /usr/local/pureftpd/etc/welcome #添加Pure-FTPd登录欢迎信息文件,内容可以自定义
Welcome to Pure-FTPd
ctrl+o #保存
ctrl+x #退出
cp /usr/local/pureftpd/etc/pure-ftpd.conf /usr/local/pureftpd/etc/pure-ftpd.conf-bak #备份配置文件
nano /usr/local/pureftpd/etc/pure-ftpd.conf #编辑配置文件
Bind 0.0.0.0,21 #设置ftp端口,默认为21,0.0.0.0表示本机所有ip地址
PassivePortRange 30000 50000 #设置PureFTP被动端口
AnonymousCantUpload yes #禁止匿名用户上传文件( no表示允许上传)
NoAnonymous yes #禁止匿名连接,仅允许认证用户连接
UnixAuthentication no #禁止系统用户认证
Daemonize yes #允许后台运行
PureDB /usr/local/pureftpd/etc/pureftpd.pdb #虚拟用户数据文件
PIDFile /usr/local/pureftpd/var/run/pure-ftpd.pid #进程文件
AltLog clf:/usr/local/pureftpd/var/log/pureftpd.log #日志文件
FortunesFile /usr/local/pureftpd/etc/welcome #Pure-FTPd登录欢迎信息
#TLS 2 #支持加密传输
#CertFile /usr/local/pureftpd/ssl/pure-ftpd.pem #加密证书路径
ctrl+o #保存
ctrl+x #退出
systemctl restart pure-ftpd.service #重启
5、使用ftp客户端进行连接
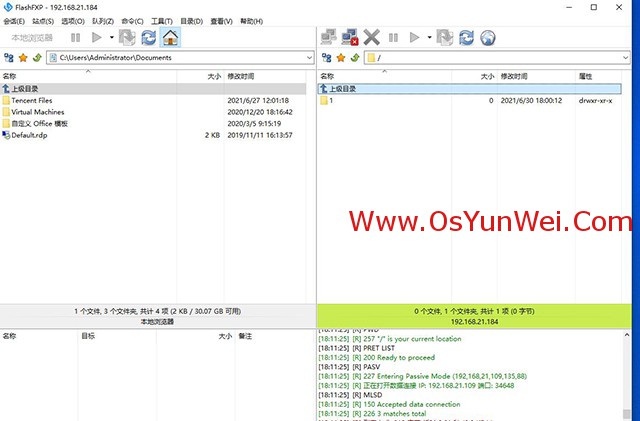
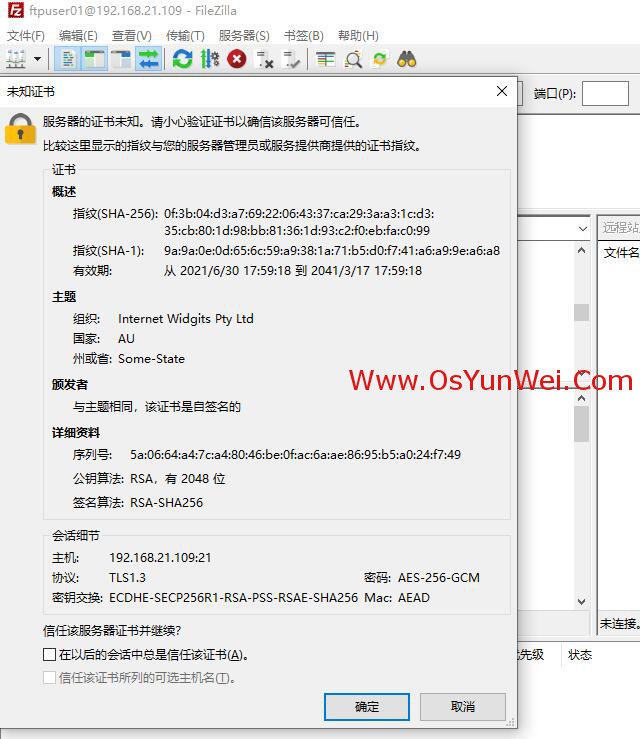
在Windows下使用ftp客户端软件(FileZilla、FlashFXP)连接ftp服务器


扩展阅读:
1、pure-ftpd虚拟用户相关操作
/usr/local/pureftpd/bin/pure-pw passwd ftpuser01 #修改密码
/usr/local/pureftpd/bin/pure-pw useradd ftpuser01 -u www -d /data/web/ftpuser01 #添加用户
/usr/local/pureftpd/bin/pure-pw userdel ftpuser01 #删除用户
/usr/local/pureftpd/bin/pure-pw usermod ftpuser01 -d /data/web/ftpuser01 #修改用户目录
/usr/local/pureftpd/bin/pure-pw show ftpuser01 #查看用户详细信息
/usr/local/pureftpd/bin/pure-pw list #查看所有用户
/usr/local/pureftpd/bin/pure-pw mkdb #对ftp虚拟用户进行修改等操作后要重新生成数据文件,重启pure-ftpd服务才能生效
2、Pure-FTPd服务器启用加密传输
mkdir /usr/local/pureftpd/ssl #创建加密证书存放目录
openssl req -x509 -nodes -days 7200 -newkey rsa:2048 -keyout /usr/local/pureftpd/ssl/pure-ftpd.pem -out /usr/local/pureftpd/ssl/pure-ftpd.pem #创建证书,注册信息可以自定义填写,我们是自己使用,不需要证书颁发机构认证
chmod 600 /usr/local/pureftpd/ssl/pure-ftpd.pem #设置证书文件权限
在Pure-FTPd配置文件/usr/local/pureftpd/etc/pure-ftpd.conf中设置启用证书
TLS 2 #支持加密传输
CertFile /usr/local/pureftpd/ssl/pure-ftpd.pem #加密证书路径
#TLS和CertFile这两个选项必须同时启用,TLS的值为1的时候,不启用ssl加密,值为2启用ssl加密
systemctl restart pure-ftpd.service #重启
至此,Ubuntu 20.04.x/Debian 10.x译安装配置Pure-FTPd服务器教程完成。

 ②190706903
  ③203744115


