
Docker是一个开源的应用容器引擎,目前分为社区版本(CE)和企业版本(EE),一般使用社区版本。
CentOS系统下Docker目前支持CentOS 7.x 8.x 版本,系统内核版本为Linux 3.10及其以上版本。
一、安装前准备工作
1、CentOS 升级系统内核到最新版
https://www.osyunwei.com/archives/11582.html
2、CentOS系统关闭selinux
#执行以下命令
setenforce 0
sed -i 's/^SELINUX=.*/SELINUX=disabled/' /etc/selinux/config
reboot #重启系统
/usr/sbin/sestatus -v #查看selinux状态,disabled表示关闭
[root@master01 ~]# /usr/sbin/sestatus -v
SELinux status: disabled
3、防火墙设置
一般情况下访问Docker容器内部的应用需要设置宿主机端口映射功能,测试环境下可以开启iptables防火墙并清空防火墙规则,
正式生产环境建议开启防火墙,再按需开启相应端口号。
3.1关闭firewall:
systemctl stop firewalld.service #停止firewall
systemctl disable firewalld.service #禁止firewall开机启动
systemctl mask firewalld
systemctl stop firewalld
yum remove firewalld
3.2安装iptables防火墙
yum install iptables-services #安装
systemctl enable iptables.service #设置防火墙开机启动
iptables -F #清空规则
service iptables save #保存配置规则
systemctl restart iptables.service #启动防火墙使配置生效
[root@master01 ~]# cat /etc/sysconfig/iptables #查看防火墙配置文件
# Generated by iptables-save v1.4.21 on Mon Jul 19 04:03:09 2021
*filter
:INPUT ACCEPT [19:1192]
:FORWARD ACCEPT [0:0]
:OUTPUT ACCEPT [19:2344]
COMMIT
# Completed on Mon Jul 19 04:03:09 2021
4、关闭交换分区
#执行以下命令
swapoff -a
sed -i '/ swap / s/^\(.*\)$/#\1/g' /etc/fstab
[root@master01 ~]# free -m #查看swap已经关闭
total used free shared buff/cache available
Mem: 1955 131 1729 8 94 1698
Swap:
5、调整内核参数
5.1
#执行以下命令
modprobe br_netfilter
modprobe ip_vs
modprobe ip_conntrack
cat >> /etc/rc.d/rc.local << EOF
modprobe br_netfilter
modprobe ip_vs
modprobe ip_conntrack
EOF
chmod +x /etc/rc.d/rc.local
5.2
vi /etc/security/limits.conf #在最后一行添加以下代码
* hard nofile 65535
* soft nofile 65535
* hard nproc 65535
* soft nproc 65535
:wq! #保存退出
#查看hard和soft限制数
ulimit -Hn
ulimit -Sn
5.3
vi /etc/sysctl.d/docker.conf
net.bridge.bridge-nf-call-iptables = 1
net.bridge.bridge-nf-call-ip6tables = 1
net.bridge.bridge-nf-call-arptables=1
net.ipv4.ip_forward = 1
vm.swappiness = 0
vm.overcommit_memory = 1
vm.panic_on_oom = 0
fs.inotify.max_user_instances = 8192
fs.inotify.max_user_watches = 1048576
fs.file-max = 52706963
fs.nr_open = 52706963
net.ipv6.conf.all.disable_ipv6 = 1
net.netfilter.nf_conntrack_max = 2310720
:wq! #保存退出
sysctl --system
sysctl -p /etc/sysctl.d/docker.conf
5.4开启IPVS支持
vi /etc/sysconfig/modules/ipvs.modules
#!/bin/bash
ipvs_modules="ip_vs ip_vs_lc ip_vs_wlc ip_vs_rr ip_vs_wrr ip_vs_lblc ip_vs_lblcr ip_vs_dh ip_vs_sh ip_vs_fo ip_vs_nq ip_vs_sed ip_vs_ftp nf_conntrack"
for kernel_module in ${ipvs_modules}; do
/sbin/modinfo -F filename ${kernel_module} > /dev/null 2>&1
if [ $? -eq 0 ]; then
/sbin/modprobe ${kernel_module}
fi
done
:wq! #保存退出
#执行以下命令使配置生效
chmod 755 /etc/sysconfig/modules/ipvs.modules
sh /etc/sysconfig/modules/ipvs.modules
lsmod | grep ip_vs
二、CentOS 7.9安装Docker-ce社区版本
1、卸载旧版本(如果没有安装就不需要执行)
yum remove docker docker-common docker-selinux docker-engine
2、安装docker-ce依赖包
yum install yum-utils device-mapper-persistent-data lvm2
3、设置docker-ce源 #docker-ce是社区版本
yum-config-manager --add-repo https://download.docker.com/linux/centos/docker-ce.repo
[root@master01 ~]# yum-config-manager --add-repo https://download.docker.com/linux/centos/docker-ce.repo
Loaded plugins: fastestmirror
adding repo from: https://download.docker.com/linux/centos/docker-ce.repo
grabbing file https://download.docker.com/linux/centos/docker-ce.repo to /etc/yum.repos.d/docker-ce.repo
repo saved to /etc/yum.repos.d/docker-ce.repo
#可以使用国内阿里云的docker源
yum-config-manager --add-repo http://mirrors.aliyun.com/docker-ce/linux/centos/docker-ce.repo
4、重新建立缓存
yum makecache fast
5、列出可安装的docker版本
yum list docker-ce --showduplicates | sort -r
[root@master01 yum.repos.d]# yum list docker-ce --showduplicates | sort -r
* updates: mirrors.cn99.com
Loading mirror speeds from cached hostfile
Loaded plugins: fastestmirror
* extras: mirrors.163.com
* epel: mirrors.bfsu.edu.cn
* elrepo: mirror-hk.koddos.net
docker-ce.x86_64 3:20.10.7-3.el7 docker-ce-stable
docker-ce.x86_64 3:20.10.6-3.el7 docker-ce-stable
docker-ce.x86_64 3:20.10.5-3.el7 docker-ce-stable
docker-ce.x86_64 3:20.10.4-3.el7 docker-ce-stable
docker-ce.x86_64 3:20.10.3-3.el7 docker-ce-stable
docker-ce.x86_64 3:20.10.2-3.el7 docker-ce-stable
docker-ce.x86_64 3:20.10.1-3.el7 docker-ce-stable
docker-ce.x86_64 3:20.10.0-3.el7 docker-ce-stable
docker-ce.x86_64 3:19.03.9-3.el7 docker-ce-stable
docker-ce.x86_64 3:19.03.8-3.el7 docker-ce-stable
docker-ce.x86_64 3:19.03.7-3.el7 docker-ce-stable
docker-ce.x86_64 3:19.03.6-3.el7 docker-ce-stable
docker-ce.x86_64 3:19.03.5-3.el7 docker-ce-stable
docker-ce.x86_64 3:19.03.4-3.el7 docker-ce-stable
docker-ce.x86_64 3:19.03.3-3.el7 docker-ce-stable
docker-ce.x86_64 3:19.03.2-3.el7 docker-ce-stable
docker-ce.x86_64 3:19.03.15-3.el7 docker-ce-stable
docker-ce.x86_64 3:19.03.14-3.el7 docker-ce-stable
docker-ce.x86_64 3:19.03.1-3.el7 docker-ce-stable
docker-ce.x86_64 3:19.03.13-3.el7 docker-ce-stable
docker-ce.x86_64 3:19.03.12-3.el7 docker-ce-stable
docker-ce.x86_64 3:19.03.11-3.el7 docker-ce-stable
docker-ce.x86_64 3:19.03.10-3.el7 docker-ce-stable
docker-ce.x86_64 3:19.03.0-3.el7 docker-ce-stable
docker-ce.x86_64 3:18.09.9-3.el7 docker-ce-stable
docker-ce.x86_64 3:18.09.8-3.el7 docker-ce-stable
docker-ce.x86_64 3:18.09.7-3.el7 docker-ce-stable
docker-ce.x86_64 3:18.09.6-3.el7 docker-ce-stable
docker-ce.x86_64 3:18.09.5-3.el7 docker-ce-stable
docker-ce.x86_64 3:18.09.4-3.el7 docker-ce-stable
docker-ce.x86_64 3:18.09.3-3.el7 docker-ce-stable
docker-ce.x86_64 3:18.09.2-3.el7 docker-ce-stable
docker-ce.x86_64 3:18.09.1-3.el7 docker-ce-stable
docker-ce.x86_64 3:18.09.0-3.el7 docker-ce-stable
docker-ce.x86_64 18.06.3.ce-3.el7 docker-ce-stable
docker-ce.x86_64 18.06.2.ce-3.el7 docker-ce-stable
docker-ce.x86_64 18.06.1.ce-3.el7 docker-ce-stable
docker-ce.x86_64 18.06.0.ce-3.el7 docker-ce-stable
docker-ce.x86_64 18.03.1.ce-1.el7.centos docker-ce-stable
docker-ce.x86_64 18.03.0.ce-1.el7.centos docker-ce-stable
docker-ce.x86_64 17.12.1.ce-1.el7.centos docker-ce-stable
docker-ce.x86_64 17.12.0.ce-1.el7.centos docker-ce-stable
docker-ce.x86_64 17.09.1.ce-1.el7.centos docker-ce-stable
docker-ce.x86_64 17.09.0.ce-1.el7.centos docker-ce-stable
docker-ce.x86_64 17.06.2.ce-1.el7.centos docker-ce-stable
docker-ce.x86_64 17.06.1.ce-1.el7.centos docker-ce-stable
docker-ce.x86_64 17.06.0.ce-1.el7.centos docker-ce-stable
docker-ce.x86_64 17.03.3.ce-1.el7 docker-ce-stable
docker-ce.x86_64 17.03.2.ce-1.el7.centos docker-ce-stable
docker-ce.x86_64 17.03.1.ce-1.el7.centos docker-ce-stable
docker-ce.x86_64 17.03.0.ce-1.el7.centos docker-ce-stable
* base: mirrors.cn99.com
Available Packages
6、安装指定版本docker-ce
#yum install docker-ce-<VERSION_STRING> docker-ce-cli-<VERSION_STRING> containerd.io
yum install docker-ce-19.03.9 docker-ce-cli-19.03.9 containerd.io
[root@master01 yum.repos.d]# yum install docker-ce-19.03.9 docker-ce-cli-19.03.9 containerd.io
Loaded plugins: fastestmirror
Loading mirror speeds from cached hostfile
* base: mirrors.cn99.com
* elrepo: mirror-hk.koddos.net
* epel: mirrors.nju.edu.cn
* extras: mirrors.163.com
* updates: mirrors.cn99.com
Resolving Dependencies
--> Running transaction check
---> Package containerd.io.x86_64 0:1.4.8-3.1.el7 will be installed
--> Processing Dependency: container-selinux >= 2:2.74 for package: containerd.io-1.4.8-3.1.el7.x86_64
---> Package docker-ce.x86_64 3:19.03.9-3.el7 will be installed
--> Processing Dependency: libcgroup for package: 3:docker-ce-19.03.9-3.el7.x86_64
---> Package docker-ce-cli.x86_64 1:19.03.9-3.el7 will be installed
--> Running transaction check
---> Package container-selinux.noarch 2:2.119.2-1.911c772.el7_8 will be installed
--> Processing Dependency: policycoreutils-python for package: 2:container-selinux-2.119.2-1.911c772.el7_8.noarch
---> Package libcgroup.x86_64 0:0.41-21.el7 will be installed
--> Running transaction check
---> Package policycoreutils-python.x86_64 0:2.5-34.el7 will be installed
--> Processing Dependency: setools-libs >= 3.3.8-4 for package: policycoreutils-python-2.5-34.el7.x86_64
--> Processing Dependency: libsemanage-python >= 2.5-14 for package: policycoreutils-python-2.5-34.el7.x86_64
--> Processing Dependency: audit-libs-python >= 2.1.3-4 for package: policycoreutils-python-2.5-34.el7.x86_64
--> Processing Dependency: python-IPy for package: policycoreutils-python-2.5-34.el7.x86_64
--> Processing Dependency: libqpol.so.1(VERS_1.4)(64bit) for package: policycoreutils-python-2.5-34.el7.x86_64
--> Processing Dependency: libqpol.so.1(VERS_1.2)(64bit) for package: policycoreutils-python-2.5-34.el7.x86_64
--> Processing Dependency: libapol.so.4(VERS_4.0)(64bit) for package: policycoreutils-python-2.5-34.el7.x86_64
--> Processing Dependency: checkpolicy for package: policycoreutils-python-2.5-34.el7.x86_64
--> Processing Dependency: libqpol.so.1()(64bit) for package: policycoreutils-python-2.5-34.el7.x86_64
--> Processing Dependency: libapol.so.4()(64bit) for package: policycoreutils-python-2.5-34.el7.x86_64
--> Running transaction check
---> Package audit-libs-python.x86_64 0:2.8.5-4.el7 will be installed
---> Package checkpolicy.x86_64 0:2.5-8.el7 will be installed
---> Package libsemanage-python.x86_64 0:2.5-14.el7 will be installed
---> Package python-IPy.noarch 0:0.75-6.el7 will be installed
---> Package setools-libs.x86_64 0:3.3.8-4.el7 will be installed
--> Finished Dependency Resolution
Dependencies Resolved
=====================================================================================================================================================================================================
Package Arch Version Repository Size
=====================================================================================================================================================================================================
Installing:
containerd.io x86_64 1.4.8-3.1.el7 docker-ce-stable 30 M
docker-ce x86_64 3:19.03.9-3.el7 docker-ce-stable 24 M
docker-ce-cli x86_64 1:19.03.9-3.el7 docker-ce-stable 38 M
Installing for dependencies:
audit-libs-python x86_64 2.8.5-4.el7 base 76 k
checkpolicy x86_64 2.5-8.el7 base 295 k
container-selinux noarch 2:2.119.2-1.911c772.el7_8 extras 40 k
libcgroup x86_64 0.41-21.el7 base 66 k
libsemanage-python x86_64 2.5-14.el7 base 113 k
policycoreutils-python x86_64 2.5-34.el7 base 457 k
python-IPy noarch 0.75-6.el7 base 32 k
setools-libs x86_64 3.3.8-4.el7 base 620 k
Transaction Summary
=====================================================================================================================================================================================================
Install 3 Packages (+8 Dependent packages)
Total download size: 94 M
Installed size: 380 M
Is this ok [y/d/N]: y
Downloading packages:
(1/11): container-selinux-2.119.2-1.911c772.el7_8.noarch.rpm | 40 kB 00:00:00
(2/11): checkpolicy-2.5-8.el7.x86_64.rpm | 295 kB 00:00:00
(3/11): audit-libs-python-2.8.5-4.el7.x86_64.rpm | 76 kB 00:00:05
warning: /var/cache/yum/x86_64/7/docker-ce-stable/packages/docker-ce-19.03.9-3.el7.x86_64.rpm: Header V4 RSA/SHA512 Signature, key ID 621e9f35: NOKEY ] 2.3 MB/s | 25 MB 00:00:29 ETA
Public key for docker-ce-19.03.9-3.el7.x86_64.rpm is not installed
(4/11): docker-ce-19.03.9-3.el7.x86_64.rpm | 24 MB 00:00:12
(5/11): libcgroup-0.41-21.el7.x86_64.rpm | 66 kB 00:00:00
(6/11): policycoreutils-python-2.5-34.el7.x86_64.rpm | 457 kB 00:00:00
(7/11): python-IPy-0.75-6.el7.noarch.rpm | 32 kB 00:00:00
(8/11): setools-libs-3.3.8-4.el7.x86_64.rpm | 620 kB 00:00:00
(9/11): libsemanage-python-2.5-14.el7.x86_64.rpm | 113 kB 00:00:00
(10/11): docker-ce-cli-19.03.9-3.el7.x86_64.rpm | 38 MB 00:00:12
(11/11): containerd.io-1.4.8-3.1.el7.x86_64.rpm | 30 MB 00:16:14
-----------------------------------------------------------------------------------------------------------------------------------------------------------------------------------------------------
Total 99 kB/s | 94 MB 00:16:14
Retrieving key from https://download.docker.com/linux/centos/gpg
Importing GPG key 0x621E9F35:
Userid : "Docker Release (CE rpm) <docker@docker.com>"
Fingerprint: 060a 61c5 1b55 8a7f 742b 77aa c52f eb6b 621e 9f35
From : https://download.docker.com/linux/centos/gpg
Is this ok [y/N]: y
Running transaction check
Running transaction test
Transaction test succeeded
Running transaction
Installing : libcgroup-0.41-21.el7.x86_64 1/11
Installing : setools-libs-3.3.8-4.el7.x86_64 2/11
Installing : audit-libs-python-2.8.5-4.el7.x86_64 3/11
Installing : checkpolicy-2.5-8.el7.x86_64 4/11
Installing : python-IPy-0.75-6.el7.noarch 5/11
Installing : 1:docker-ce-cli-19.03.9-3.el7.x86_64 6/11
Installing : libsemanage-python-2.5-14.el7.x86_64 7/11
Installing : policycoreutils-python-2.5-34.el7.x86_64 8/11
Installing : 2:container-selinux-2.119.2-1.911c772.el7_8.noarch 9/11
setsebool: SELinux is disabled.
Installing : containerd.io-1.4.8-3.1.el7.x86_64 10/11
Installing : 3:docker-ce-19.03.9-3.el7.x86_64 11/11
Verifying : 3:docker-ce-19.03.9-3.el7.x86_64 1/11
Verifying : libsemanage-python-2.5-14.el7.x86_64 2/11
Verifying : containerd.io-1.4.8-3.1.el7.x86_64 3/11
Verifying : 2:container-selinux-2.119.2-1.911c772.el7_8.noarch 4/11
Verifying : 1:docker-ce-cli-19.03.9-3.el7.x86_64 5/11
Verifying : python-IPy-0.75-6.el7.noarch 6/11
Verifying : checkpolicy-2.5-8.el7.x86_64 7/11
Verifying : policycoreutils-python-2.5-34.el7.x86_64 8/11
Verifying : audit-libs-python-2.8.5-4.el7.x86_64 9/11
Verifying : setools-libs-3.3.8-4.el7.x86_64 10/11
Verifying : libcgroup-0.41-21.el7.x86_64 11/11
Installed:
containerd.io.x86_64 0:1.4.8-3.1.el7 docker-ce.x86_64 3:19.03.9-3.el7 docker-ce-cli.x86_64 1:19.03.9-3.el7
Dependency Installed:
audit-libs-python.x86_64 0:2.8.5-4.el7 checkpolicy.x86_64 0:2.5-8.el7 container-selinux.noarch 2:2.119.2-1.911c772.el7_8 libcgroup.x86_64 0:0.41-21.el7 libsemanage-python.x86_64 0:2.5-14.el7
policycoreutils-python.x86_64 0:2.5-34.el7 python-IPy.noarch 0:0.75-6.el7 setools-libs.x86_64 0:3.3.8-4.el7
Complete!
[root@master01 yum.repos.d]#
7、查看docker版本
yum list installed | grep docker
docker --version
[root@master01 yum.repos.d]# yum list installed | grep docker
containerd.io.x86_64 1.4.8-3.1.el7 @docker-ce-stable
docker-ce.x86_64 3:19.03.9-3.el7 @docker-ce-stable
docker-ce-cli.x86_64 1:19.03.9-3.el7 @docker-ce-stable
[root@master01 yum.repos.d]# docker --version
Docker version 19.03.9, build 9d988398e7
8、添加docker开机启动
systemctl enable docker
[root@master01 yum.repos.d]# systemctl enable docker
Created symlink from /etc/systemd/system/multi-user.target.wants/docker.service to /usr/lib/systemd/system/docker.service.
systemctl start docker #启动docker
systemctl status docker #查看docker状态
[root@master01 yum.repos.d]# systemctl status docker
● docker.service - Docker Application Container Engine
Loaded: loaded (/usr/lib/systemd/system/docker.service; enabled; vendor preset: disabled)
Active: active (running) since Thu 2021-07-29 10:45:27 CST; 1min 3s ago
Docs: https://docs.docker.com
Main PID: 11224 (dockerd)
Tasks: 11
Memory: 36.8M
CGroup: /system.slice/docker.service
└─11224 /usr/bin/dockerd -H fd:// --containerd=/run/containerd/containerd.sock
Jul 29 10:45:25 master01.k8s dockerd[11224]: time="2021-07-29T10:45:25.290799295+08:00" level=info msg="ClientConn switching balancer to \"pick_first\"" module=grpc
Jul 29 10:45:25 master01.k8s dockerd[11224]: time="2021-07-29T10:45:25.419328622+08:00" level=warning msg="Your kernel does not support cgroup blkio weight"
Jul 29 10:45:25 master01.k8s dockerd[11224]: time="2021-07-29T10:45:25.419375062+08:00" level=warning msg="Your kernel does not support cgroup blkio weight_device"
Jul 29 10:45:25 master01.k8s dockerd[11224]: time="2021-07-29T10:45:25.419810835+08:00" level=info msg="Loading containers: start."
Jul 29 10:45:26 master01.k8s dockerd[11224]: time="2021-07-29T10:45:26.147897319+08:00" level=info msg="Default bridge (docker0) is assigned with an IP address 172.17.0.0/16. Daemon...d IP address"
Jul 29 10:45:26 master01.k8s dockerd[11224]: time="2021-07-29T10:45:26.805189506+08:00" level=info msg="Loading containers: done."
Jul 29 10:45:26 master01.k8s dockerd[11224]: time="2021-07-29T10:45:26.923720323+08:00" level=info msg="Docker daemon" commit=9d988398e7 graphdriver(s)=overlay2 version=19.03.9
Jul 29 10:45:26 master01.k8s dockerd[11224]: time="2021-07-29T10:45:26.923876965+08:00" level=info msg="Daemon has completed initialization"
Jul 29 10:45:27 master01.k8s systemd[1]: Started Docker Application Container Engine.
Jul 29 10:45:27 master01.k8s dockerd[11224]: time="2021-07-29T10:45:27.026242449+08:00" level=info msg="API listen on /var/run/docker.sock"
Hint: Some lines were ellipsized, use -l to show in full.
[root@master01 yum.repos.d]#
systemctl restart docker #重启docker
9、配置docker镜像加速
#查看是否在/usr/lib/systemd/system/docker.service文件中配置过镜像地址
systemctl cat docker | grep '\-\-registry\-mirror'
#如果执行该命令后有内容输出,请执行systemctl cat docker查看ExecStart=这行,然后编辑/usr/lib/systemd/system/docker.service文件
vi /usr/lib/systemd/system/docker.service #修改为以下内容
ExecStart=/usr/bin/dockerd -H fd:// --containerd=/run/containerd/containerd.sock
:wq! #保存退出
由于Docker Hub的服务器在国外,下载docker镜像比较慢,我们可以配置国内的镜像地址,这样下载docker镜像速度就会很快。
国内主要的镜像加速器有:
163:https://hub-mirror.c.163.com
百度:https://mirror.baidubce.com/
阿里云:https://<自己的id>.mirror.aliyuncs.com
#使用阿里云账号登录https://cr.console.aliyun.com/cn-hangzhou/instances/mirrors,登录成功后,左侧菜单-容器镜像服务-镜像工具-镜像加速器-加速器
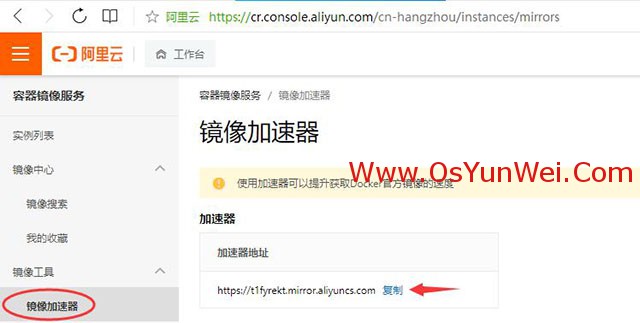
#复制加速器地址:https://t1fyrekt.mirror.aliyuncs.com
#每个阿里云账号下面的加速器地址都不一样
#CentOS7.x已使用systemd进行服务管理,对于使用systemd的系统,在/etc/docker/daemon.json文件中进行添加
mkdir -p /etc/docker #创建目录,执行以下操作
tee /etc/docker/daemon.json <<-'EOF'
{
"registry-mirrors": ["https://t1fyrekt.mirror.aliyuncs.com"]
}
EOF
cat /etc/docker/daemon.json
[root@master01 yum.repos.d]# cat /etc/docker/daemon.json
{
"registry-mirrors": ["https://t1fyrekt.mirror.aliyuncs.com"]
}
vi /etc/docker/daemon.json #编辑配置文件,可以添加多个docker镜像地址
{
"registry-mirrors": ["https://t1fyrekt.mirror.aliyuncs.com","https://hub-mirror.c.163.com","https://mirror.baidubce.com/"]
}
:wq! #保存退出
systemctl daemon-reload
systemctl restart docker #重启docker
docker info #检查docker镜像加速器是否配置成功
[root@master01 yum.repos.d]# docker info
Client:
Debug Mode: false
Server:
Containers: 0
Running: 0
Paused: 0
Stopped: 0
Images: 0
Server Version: 19.03.9
Storage Driver: overlay2
Backing Filesystem: xfs
Supports d_type: true
Native Overlay Diff: true
Logging Driver: json-file
Cgroup Driver: cgroupfs
Plugins:
Volume: local
Network: bridge host ipvlan macvlan null overlay
Log: awslogs fluentd gcplogs gelf journald json-file local logentries splunk syslog
Swarm: inactive
Runtimes: runc
Default Runtime: runc
Init Binary: docker-init
containerd version: 7eba5930496d9bbe375fdf71603e610ad737d2b2
runc version: v1.0.0-0-g84113ee
init version: fec3683
Security Options:
seccomp
Profile: default
Kernel Version: 5.13.2-1.el7.elrepo.x86_64
Operating System: CentOS Linux 7 (Core)
OSType: linux
Architecture: x86_64
CPUs: 2
Total Memory: 1.91GiB
Name: master01.k8s
ID: TNGI:5QEO:BKT4:EVSG:5NNH:KLKQ:DUNT:GL5K:OCAO:BYC2:GFYC:WS7L
Docker Root Dir: /var/lib/docker
Debug Mode: false
Registry: https://index.docker.io/v1/
Labels:
Experimental: false
Insecure Registries:
127.0.0.0/8
Registry Mirrors:
https://t1fyrekt.mirror.aliyuncs.com/
https://hub-mirror.c.163.com/
https://mirror.baidubce.com/
Live Restore Enabled: false
#可以看到Registry Mirrors:下面有我们设置的镜像地址,说明配置成功
10、测试docker是否可用
docker pull hello-world #下载一个镜像实例
[root@master01 yum.repos.d]# docker pull hello-world
Using default tag: latest
latest: Pulling from library/hello-world
b8dfde127a29: Pull complete
Digest: sha256:df5f5184104426b65967e016ff2ac0bfcd44ad7899ca3bbcf8e44e4461491a9e
Status: Downloaded newer image for hello-world:latest
docker.io/library/hello-world:latest
docker run hello-world #运行一个镜像实例
[root@master01 yum.repos.d]# docker run hello-world
Hello from Docker!
This message shows that your installation appears to be working correctly.
To generate this message, Docker took the following steps:
1. The Docker client contacted the Docker daemon.
2. The Docker daemon pulled the "hello-world" image from the Docker Hub.
(amd64)
3. The Docker daemon created a new container from that image which runs the
executable that produces the output you are currently reading.
4. The Docker daemon streamed that output to the Docker client, which sent it
to your terminal.
To try something more ambitious, you can run an Ubuntu container with:
$ docker run -it ubuntu bash
Share images, automate workflows, and more with a free Docker ID:
https://hub.docker.com/
For more examples and ideas, visit:
https://docs.docker.com/get-started
docker images hello-world #查看该镜像的信息
[root@master01 yum.repos.d]# docker images hello-world
REPOSITORY TAG IMAGE ID CREATED SIZE
hello-world latest d1165f221234 4 months ago 13.3kB
11、使用docker部署应用
#docker基本操作
docker ps #查询运行中的容器
docker ps -a #查询所有容器
docker image ls #查询本机镜像
11.1使用docker容器部署nginx
docker search nginx #查找Docker Hub上的nginx镜像
[root@master01 ~]# docker search nginx
NAME DESCRIPTION STARS OFFICIAL AUTOMATED
nginx Official build of Nginx. 15242 [OK]
jwilder/nginx-proxy Automated Nginx reverse proxy for docker con… 2053 [OK]
richarvey/nginx-php-fpm Container running Nginx + PHP-FPM capable of… 815 [OK]
jc21/nginx-proxy-manager Docker container for managing Nginx proxy ho… 225
linuxserver/nginx An Nginx container, brought to you by LinuxS… 150
tiangolo/nginx-rtmp Docker image with Nginx using the nginx-rtmp… 137 [OK]
jlesage/nginx-proxy-manager Docker container for Nginx Proxy Manager 127 [OK]
alfg/nginx-rtmp NGINX, nginx-rtmp-module and FFmpeg from sou… 102 [OK]
jasonrivers/nginx-rtmp Docker images to host RTMP streams using NGI… 92 [OK]
nginxdemos/hello NGINX webserver that serves a simple page co… 70 [OK]
privatebin/nginx-fpm-alpine PrivateBin running on an Nginx, php-fpm & Al… 56 [OK]
nginx/nginx-ingress NGINX and NGINX Plus Ingress Controllers fo… 55
nginxinc/nginx-unprivileged Unprivileged NGINX Dockerfiles 45
staticfloat/nginx-certbot Opinionated setup for automatic TLS certs lo… 24 [OK]
schmunk42/nginx-redirect A very simple container to redirect HTTP tra… 19 [OK]
nginx/nginx-prometheus-exporter NGINX Prometheus Exporter for NGINX and NGIN… 19
nginxproxy/nginx-proxy Automated Nginx reverse proxy for docker con… 16
centos/nginx-112-centos7 Platform for running nginx 1.12 or building … 15
raulr/nginx-wordpress Nginx front-end for the official wordpress:f… 13 [OK]
centos/nginx-18-centos7 Platform for running nginx 1.8 or building n… 13
bitwarden/nginx The Bitwarden nginx web server acting as a r… 11
mailu/nginx Mailu nginx frontend 9 [OK]
sophos/nginx-vts-exporter Simple server that scrapes Nginx vts stats a… 7 [OK]
ansibleplaybookbundle/nginx-apb An APB to deploy NGINX 2 [OK]
wodby/nginx Generic nginx 1 [OK]
docker pull nginx #拉取官方Nginx镜像
docker images nginx #查看镜像
[root@master01 ~]# docker images nginx
REPOSITORY TAG IMAGE ID CREATED SIZE
nginx latest 08b152afcfae 9 days ago 133MB
#使用NGINX默认的配置来启动一个Nginx容器实例
docker run --rm --name nginx-demo -p 8080:80 -d nginx
浏览器打开http://192.168.21.8:8080/可以看到web页面,说明部署成功。
参数说明:
--rm:容器终止运行后,自动删除容器文件
--name nginx-demo:容器名为nginx-demo,可以自定义设置
-p: 端口进行映射,将本地8080端口映射到容器内部的80端口
-d:容器启动后,在后台运行
docker container ps #查看启动的docker容器
docker stop nginx-demo #停止容器
docker run --restart=always --name nginx-demo -p 8080:80 -d nginx #参数 --restart=always 表示宿主机重启后容器开机自启动
#nginx服务部署,映射本地目录到nginx容器
mkdir -p /data/nginx/www
mkdir -p /data/nginx/logs
mkdir -p /data/nginx/conf
#目录说明:
www: 目录将映射为 nginx 容器配置的虚拟目录。
logs: 目录将映射为 nginx 容器的日志目录。
conf: 目录里的配置文件将映射为 nginx 容器的配置文件。
#查看容器ID
[root@master01 ~]# docker ps
CONTAINER ID IMAGE COMMAND CREATED STATUS PORTS NAMES
78d7a3bea10c nginx "/docker-entrypoint.…" 13 minutes ago Up 13 minutes 0.0.0.0:8080->80/tcp nginx-test
#拷贝容器内Nginx默认配置文件到本地当前目录下的conf目录
docker cp 78d7a3bea10c:/etc/nginx/nginx.conf /data/nginx/conf/
docker run --rm -d -p 8081:80 --name nginx-test-web -v /data/nginx/www:/usr/share/nginx/html -v /data/nginx/conf/nginx.conf:/etc/nginx/nginx.conf -v /data/nginx/logs:/var/log/nginx nginx
#参数 --restart=always 表示宿主机重启后容器开机自启动
docker run --restart=always -d -p 8081:80 --name nginx-test-web -v /data/nginx/www:/usr/share/nginx/html -v /data/nginx/conf/nginx.conf:/etc/nginx/nginx.conf -v /data/nginx/logs:/var/log/nginx nginx
说明:
-v 目录挂载,冒号前为外部目录,冒号后为容器内目录,相当于外部目录中的内容会映射同步到容器内
--rm:容器终止运行后,自动删除容器文件。
-p 8081:80: 将容器的80端口映射到主机的8081端口
--name nginx-test-web:将容器命名为 nginx-test-web
-v /data/nginx/www:/usr/share/nginx/html:将我们自己创建的www目录挂载到容器的/usr/share/nginx/html
-v /data/nginx/conf/nginx.conf:/etc/nginx/nginx.conf:将我们自己创建的nginx.conf挂载到容器的/etc/nginx/nginx.conf
-v /data/nginx/logs:/var/log/nginx:将我们自己创建的logs挂载到容器的/var/log/nginx
cd /data/nginx/www
vi /data/nginx/www/index.html #编辑
<!DOCTYPE html>
<html>
<head>
<meta charset="utf-8">
<title>Nginx</title>
</head>
<body>
<h1>我的第一个Docker Nginx应用</h1>
</body>
</html>
:wq! #保存退出
浏览器打开http://192.168.21.8:8081/
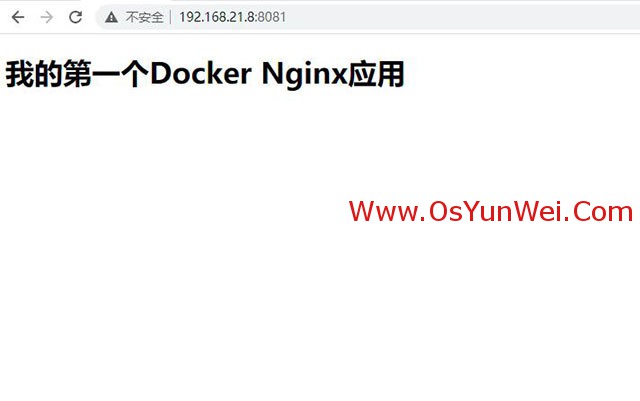
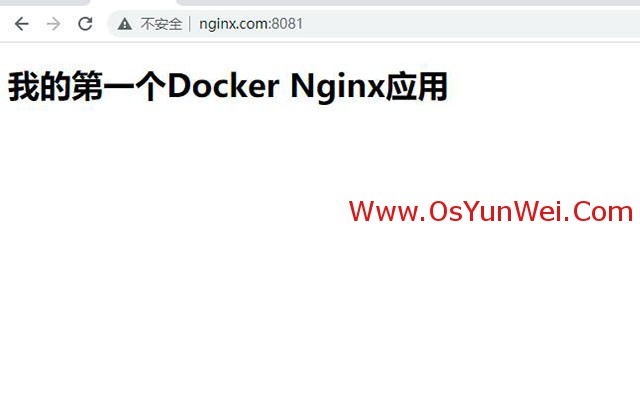
还可以绑定域名nginx,使用域名访问web
[root@master01 www]# docker ps
CONTAINER ID IMAGE COMMAND CREATED STATUS PORTS NAMES
791eb8aa57b5 nginx "/docker-entrypoint.…" 4 seconds ago Up 3 seconds 0.0.0.0:8081->80/tcp nginx-test-web
78d7a3bea10c nginx "/docker-entrypoint.…" About an hour ago Up About an hour 0.0.0.0:8080->80/tcp nginx-test
#使用该命令进入一个已经在运行的容器
docker exec -it 791eb8aa57b5 /bin/bash
exit #退出容器
如果要正常退出不关闭容器,请按Ctrl+P+Q进行退出容器
如果使用exit退出,那么在退出之后会关闭容器,可以使用下面的流程进行恢复
使用docker restart命令重启容器
使用docker attach命令进入容器
#扩展阅读
#docker操作相关命令
docker ps -aq #列出所有的容器ID
docker stop $(docker ps -aq) #停止所有的容器
docker rm $(docker ps -aq) #删除所有的容器
docker rmi $(docker images -q) #删除所有的镜像
docker image prune --force --all #删除所有不使用的镜像
docker image prune -f -a #删除所有不使用的镜像
docker container prune -f #删除所有停止的容器
docker help #查看docker帮助
docker image --help #查看 docker中 镜像相关帮助
docker image ls #查看当前所有镜像
docker images #查看镜像
docker image inspect nginx #查看nginx镜像详细信息
docker pull nginx:1.20.1 #下载指定版本镜像 nginx
docker image rm nginx:1.20.1 #删除
docker rmi nginx:1.20.1 #删除镜像
docker image save nginx:1.20.1 > nginx.tar.gz #导出nginx镜像
docker load -i uptime-kuma.tar.gz #导入镜像到docker
docker ps #仅列出当前运行的容器
docker ps -l #列出最新创建得容器
docker inspect nginx #列出指定容器的详细信息
docker ps -a #列出所有容器(包括未运行的)
docker start nginx #启动容器web
docker stop nginx #停止容器web
docker rm nginx #删除容器
docker port nginx #查看指定容器端口映射
docker top nginx #查看容器中有哪些进程
docker stats nginx #查看容器资源使用情况
docker cp web.tar.gz nginx:/data #将宿主机web.tar.gz拷贝到容器nginx的/data目录
docker exec -it nginx ls /data #查看容器目录
docker exec -it nginx /bin/bash #进入容器
docker commit web nginx:web #将修改后的web容器提交为一个新镜像nginx:web
docker run -d --name nginx --memory="1024m" nginx #允许容器最多使用1GB内存
docker run -d --name nginx --cpus="1.5" nginx #允许容器最多使用1.5核心cpu
docker run -d --name nginx --cpus=".5" nginx #允许容器最多使用50%的CPU
至此,CentOS 7.x 安装Docker-ce社区版本教程完成。

 ②190706903
  ③203744115


